Most Astro tutorials stop at pnpm create astro. You get a src/pages/index.astro file, a friendly welcome page, and the implication that you are done. You are not. By the time you need TypeScript strict mode, Tailwind CSS 4 with design tokens, self-hosted fonts, Expressive Code blocks, build-time Mermaid diagrams, and a deployment pipeline that enforces Lighthouse 100/100/100/100 — you are patching together Stack Overflow answers from three different Astro major versions.
This post builds the foundation that every subsequent post in this series depends on. We scaffold a production-grade Astro 5 project with the exact tooling this blog runs on.
Why Astro 5 for Content Sites
Before touching the terminal, the framework choice deserves justification. If you are building a content-heavy site — a blog, documentation portal, marketing site, or knowledge base — Astro’s architecture makes a specific bet: ship zero JavaScript by default, add interactivity only where it matters.
Next.js, Remix, and SvelteKit are application frameworks. They assume every page needs a JavaScript runtime. Astro assumes the opposite. Static pages are static. Interactive components — a search dialog, a chart, a theme toggle — hydrate independently as “islands” in a sea of static HTML.
| Framework | Default JS | Content Performance | Interactive Content |
|---|---|---|---|
| Astro 5 | Zero JS on static pages | Lighthouse 100/100 achievable with zero effort | Islands hydrate independently — one slow chart does not block the page |
| Next.js 15 | React runtime on every page (~85KB min) | Requires careful RSC architecture to minimize JS | Full-page hydration — everything ships or nothing does |
| Hugo | Zero JS | Fastest raw build times | No component model — interactivity requires manual script tags |
| SvelteKit | Svelte runtime (~15KB) | Good but never truly zero-JS | Full-page hydration with Svelte components |
The tradeoff is real: Astro is not the right choice for a SaaS dashboard or a real-time collaboration tool. But for anything where the primary value is reading — which describes most of the web — it delivers the best performance-to-complexity ratio available.
Step 1: Scaffold and Configure TypeScript
Start with the official scaffolding tool, then immediately tighten the configuration.
pnpm create astro@latest blogcraft -- --template minimal --typescript strictcd blogcraftThe --template minimal flag gives you a clean slate: one page, no sample content, no starter CSS. The --typescript strict flag sets up tsconfig.json with Astro’s strictest preset, but we need to go further.
{ "extends": "astro/tsconfigs/strict", "compilerOptions": { "baseUrl": ".", "paths": { "@/*": ["src/*"] } }}The @/* path alias eliminates the ../../../ import chains that make refactoring painful. Every import reads @/components/Header.astro regardless of file depth.
Create an .npmrc file at the project root:
auto-install-peers=trueThis tells pnpm to automatically install peer dependencies — critical for packages like rehype-mermaid that declare mermaid and playwright as peers.
Step 2: Directory Structure
Here is the directory layout we are building toward. Every file has a single responsibility. Every path is predictable.
%3b%7d%23mermaid-0 .cluster rect%7bfill:hsl(0%2c 0%25%2c 98.9215686275%25)%3bstroke:%23707070%3bstroke-width:1px%3b%7d%23mermaid-0 .cluster text%7bfill:%23333%3b%7d%23mermaid-0 .cluster span%7bcolor:%23333%3b%7d%23mermaid-0 div.mermaidTooltip%7bposition:absolute%3btext-align:center%3bmax-width:200px%3bpadding:2px%3bfont-family:arial%2csans-serif%3bfont-size:12px%3bbackground:hsl(-160%2c 0%25%2c 93.3333333333%25)%3bborder:1px solid %23707070%3bborder-radius:2px%3bpointer-events:none%3bz-index:100%3b%7d%23mermaid-0 .flowchartTitleText%7btext-anchor:middle%3bfont-size:18px%3bfill:black%3b%7d%23mermaid-0 rect.text%7bfill:none%3bstroke-width:0%3b%7d%23mermaid-0 .icon-shape%2c%23mermaid-0 .image-shape%7bbackground-color:white%3btext-align:center%3b%7d%23mermaid-0 .icon-shape p%2c%23mermaid-0 .image-shape p%7bbackground-color:white%3bpadding:2px%3b%7d%23mermaid-0 .icon-shape .label rect%2c%23mermaid-0 .image-shape .label rect%7bopacity:0.5%3bbackground-color:white%3bfill:white%3b%7d%23mermaid-0 .label-icon%7bdisplay:inline-block%3bheight:1em%3boverflow:visible%3bvertical-align:-0.125em%3b%7d%23mermaid-0 .node .label-icon path%7bfill:currentColor%3bstroke:revert%3bstroke-width:revert%3b%7d%23mermaid-0 .node .neo-node%7bstroke:%23999%3b%7d%23mermaid-0 %5bdata-look='neo'%5d.node rect%2c%23mermaid-0 %5bdata-look='neo'%5d.cluster rect%2c%23mermaid-0 %5bdata-look='neo'%5d.node polygon%7bstroke:url(%23mermaid-0-gradient)%3bfilter:drop-shadow( 1px 2px 2px rgba(185%2c185%2c185%2c1))%3b%7d%23mermaid-0 %5bdata-look='neo'%5d.node path%7bstroke:url(%23mermaid-0-gradient)%3bstroke-width:1px%3b%7d%23mermaid-0 %5bdata-look='neo'%5d.node .outer-path%7bfilter:drop-shadow( 1px 2px 2px rgba(185%2c185%2c185%2c1))%3b%7d%23mermaid-0 %5bdata-look='neo'%5d.node .neo-line path%7bstroke:%23999%3bfilter:none%3b%7d%23mermaid-0 %5bdata-look='neo'%5d.node circle%7bstroke:url(%23mermaid-0-gradient)%3bfilter:drop-shadow( 1px 2px 2px rgba(185%2c185%2c185%2c1))%3b%7d%23mermaid-0 %5bdata-look='neo'%5d.node circle .state-start%7bfill:black%3b%7d%23mermaid-0 %5bdata-look='neo'%5d.icon-shape .icon%7bfill:url(%23mermaid-0-gradient)%3bfilter:drop-shadow( 1px 2px 2px rgba(185%2c185%2c185%2c1))%3b%7d%23mermaid-0 %5bdata-look='neo'%5d.icon-shape .icon-neo path%7bstroke:url(%23mermaid-0-gradient)%3bfilter:drop-shadow( 1px 2px 2px rgba(185%2c185%2c185%2c1))%3b%7d%23mermaid-0 :root%7b--mermaid-font-family:arial%2csans-serif%3b%7d%3c/style%3e%3cg%3e%3cmarker id='mermaid-0_flowchart-v2-pointEnd' class='marker flowchart-v2' viewBox='0 0 10 10' refX='5' refY='5' markerUnits='userSpaceOnUse' markerWidth='8' markerHeight='8' orient='auto'%3e%3cpath d='M 0 0 L 10 5 L 0 10 z' class='arrowMarkerPath' style='stroke-width: 1%3b stroke-dasharray: 1%2c 0%3b'/%3e%3c/marker%3e%3cmarker id='mermaid-0_flowchart-v2-pointStart' class='marker flowchart-v2' viewBox='0 0 10 10' refX='4.5' refY='5' markerUnits='userSpaceOnUse' markerWidth='8' markerHeight='8' orient='auto'%3e%3cpath d='M 0 5 L 10 10 L 10 0 z' class='arrowMarkerPath' style='stroke-width: 1%3b stroke-dasharray: 1%2c 0%3b'/%3e%3c/marker%3e%3cmarker id='mermaid-0_flowchart-v2-pointEnd-margin' class='marker flowchart-v2' viewBox='0 0 11.5 14' refX='11.5' refY='7' markerUnits='userSpaceOnUse' markerWidth='10.5' markerHeight='14' orient='auto'%3e%3cpath d='M 0 0 L 11.5 7 L 0 14 z' class='arrowMarkerPath' style='stroke-width: 0%3b stroke-dasharray: 1%2c 0%3b'/%3e%3c/marker%3e%3cmarker id='mermaid-0_flowchart-v2-pointStart-margin' class='marker flowchart-v2' viewBox='0 0 11.5 14' refX='1' refY='7' markerUnits='userSpaceOnUse' markerWidth='11.5' markerHeight='14' orient='auto'%3e%3cpolygon points='0%2c7 11.5%2c14 11.5%2c0' class='arrowMarkerPath' style='stroke-width: 0%3b stroke-dasharray: 1%2c 0%3b'/%3e%3c/marker%3e%3cmarker id='mermaid-0_flowchart-v2-circleEnd' class='marker flowchart-v2' viewBox='0 0 10 10' refX='11' refY='5' markerUnits='userSpaceOnUse' markerWidth='11' markerHeight='11' orient='auto'%3e%3ccircle cx='5' cy='5' r='5' class='arrowMarkerPath' style='stroke-width: 1%3b stroke-dasharray: 1%2c 0%3b'/%3e%3c/marker%3e%3cmarker id='mermaid-0_flowchart-v2-circleStart' class='marker flowchart-v2' viewBox='0 0 10 10' refX='-1' refY='5' markerUnits='userSpaceOnUse' markerWidth='11' markerHeight='11' orient='auto'%3e%3ccircle cx='5' cy='5' r='5' class='arrowMarkerPath' style='stroke-width: 1%3b stroke-dasharray: 1%2c 0%3b'/%3e%3c/marker%3e%3cmarker id='mermaid-0_flowchart-v2-circleEnd-margin' class='marker flowchart-v2' viewBox='0 0 10 10' refY='5' refX='12.25' markerUnits='userSpaceOnUse' markerWidth='14' markerHeight='14' orient='auto'%3e%3ccircle cx='5' cy='5' r='5' class='arrowMarkerPath' style='stroke-width: 0%3b stroke-dasharray: 1%2c 0%3b'/%3e%3c/marker%3e%3cmarker id='mermaid-0_flowchart-v2-circleStart-margin' class='marker flowchart-v2' viewBox='0 0 10 10' refX='-2' refY='5' markerUnits='userSpaceOnUse' markerWidth='14' markerHeight='14' orient='auto'%3e%3ccircle cx='5' cy='5' r='5' class='arrowMarkerPath' style='stroke-width: 0%3b stroke-dasharray: 1%2c 0%3b'/%3e%3c/marker%3e%3cmarker id='mermaid-0_flowchart-v2-crossEnd' class='marker cross flowchart-v2' viewBox='0 0 11 11' refX='12' refY='5.2' markerUnits='userSpaceOnUse' markerWidth='11' markerHeight='11' orient='auto'%3e%3cpath d='M 1%2c1 l 9%2c9 M 10%2c1 l -9%2c9' class='arrowMarkerPath' style='stroke-width: 2%3b stroke-dasharray: 1%2c 0%3b'/%3e%3c/marker%3e%3cmarker id='mermaid-0_flowchart-v2-crossStart' class='marker cross flowchart-v2' viewBox='0 0 11 11' refX='-1' refY='5.2' markerUnits='userSpaceOnUse' markerWidth='11' markerHeight='11' orient='auto'%3e%3cpath d='M 1%2c1 l 9%2c9 M 10%2c1 l -9%2c9' class='arrowMarkerPath' style='stroke-width: 2%3b stroke-dasharray: 1%2c 0%3b'/%3e%3c/marker%3e%3cmarker id='mermaid-0_flowchart-v2-crossEnd-margin' class='marker cross flowchart-v2' viewBox='0 0 15 15' refX='17.7' refY='7.5' markerUnits='userSpaceOnUse' markerWidth='12' markerHeight='12' orient='auto'%3e%3cpath d='M 1%2c1 L 14%2c14 M 1%2c14 L 14%2c1' class='arrowMarkerPath' style='stroke-width: 2.5%3b'/%3e%3c/marker%3e%3cmarker id='mermaid-0_flowchart-v2-crossStart-margin' class='marker cross flowchart-v2' viewBox='0 0 15 15' refX='-3.5' refY='7.5' markerUnits='userSpaceOnUse' markerWidth='12' markerHeight='12' orient='auto'%3e%3cpath d='M 1%2c1 L 14%2c14 M 1%2c14 L 14%2c1' class='arrowMarkerPath' style='stroke-width: 2.5%3b stroke-dasharray: 1%2c 0%3b'/%3e%3c/marker%3e%3cg class='root'%3e%3cg class='clusters'/%3e%3cg class='edgePaths'%3e%3cpath d='M1695.195%2c57.403L1681.344%2c62.335C1667.492%2c67.268%2c1639.789%2c77.134%2c1625.938%2c85.567C1612.086%2c94%2c1612.086%2c101%2c1612.086%2c104.5L1612.086%2c108' id='mermaid-0-L_Root_Src_0' class='edge-thickness-normal edge-pattern-solid edge-thickness-normal edge-pattern-solid flowchart-link' style='%3b' data-edge='true' data-et='edge' data-id='L_Root_Src_0' data-points='W3sieCI6MTY5NS4xOTUzMTI1LCJ5Ijo1Ny40MDI1NjgyMTgyOTg1NTV9LHsieCI6MTYxMi4wODU5Mzc1LCJ5Ijo4N30seyJ4IjoxNjEyLjA4NTkzNzUsInkiOjExMn1d' data-look='classic' marker-end='url(%23mermaid-0_flowchart-v2-pointEnd)'/%3e%3cpath d='M1758.102%2c62L1758.102%2c66.167C1758.102%2c70.333%2c1758.102%2c78.667%2c1758.102%2c86.333C1758.102%2c94%2c1758.102%2c101%2c1758.102%2c104.5L1758.102%2c108' id='mermaid-0-L_Root_Public_0' class='edge-thickness-normal edge-pattern-solid edge-thickness-normal edge-pattern-solid flowchart-link' style='%3b' data-edge='true' data-et='edge' data-id='L_Root_Public_0' data-points='W3sieCI6MTc1OC4xMDE1NjI1LCJ5Ijo2Mn0seyJ4IjoxNzU4LjEwMTU2MjUsInkiOjg3fSx7IngiOjE3NTguMTAxNTYyNSwieSI6MTEyfV0=' data-look='classic' marker-end='url(%23mermaid-0_flowchart-v2-pointEnd)'/%3e%3cpath d='M1821.008%2c55.643L1836.934%2c60.869C1852.859%2c66.095%2c1884.711%2c76.548%2c1900.637%2c85.274C1916.563%2c94%2c1916.563%2c101%2c1916.563%2c104.5L1916.563%2c108' id='mermaid-0-L_Root_Scripts_0' class='edge-thickness-normal edge-pattern-solid edge-thickness-normal edge-pattern-solid flowchart-link' style='%3b' data-edge='true' data-et='edge' data-id='L_Root_Scripts_0' data-points='W3sieCI6MTgyMS4wMDc4MTI1LCJ5Ijo1NS42NDMxMDAxMzMxMTY0MDV9LHsieCI6MTkxNi41NjI1LCJ5Ijo4N30seyJ4IjoxOTE2LjU2MjUsInkiOjExMn1d' data-look='classic' marker-end='url(%23mermaid-0_flowchart-v2-pointEnd)'/%3e%3cpath d='M1569.195%2c140.597L1343.544%2c148.997C1117.893%2c157.398%2c666.591%2c174.199%2c440.94%2c186.099C215.289%2c198%2c215.289%2c205%2c215.289%2c208.5L215.289%2c212' id='mermaid-0-L_Src_Pages_0' class='edge-thickness-normal edge-pattern-solid edge-thickness-normal edge-pattern-solid flowchart-link' style='%3b' data-edge='true' data-et='edge' data-id='L_Src_Pages_0' data-points='W3sieCI6MTU2OS4xOTUzMTI1LCJ5IjoxNDAuNTk2NzMzNTk4MDc1OTZ9LHsieCI6MjE1LjI4OTA2MjUsInkiOjE5MX0seyJ4IjoyMTUuMjg5MDYyNSwieSI6MjE2fV0=' data-look='classic' marker-end='url(%23mermaid-0_flowchart-v2-pointEnd)'/%3e%3cpath d='M1569.195%2c141.371L1419.543%2c149.642C1269.891%2c157.914%2c970.586%2c174.457%2c820.934%2c186.228C671.281%2c198%2c671.281%2c205%2c671.281%2c208.5L671.281%2c212' id='mermaid-0-L_Src_Layouts_0' class='edge-thickness-normal edge-pattern-solid edge-thickness-normal edge-pattern-solid flowchart-link' style='%3b' data-edge='true' data-et='edge' data-id='L_Src_Layouts_0' data-points='W3sieCI6MTU2OS4xOTUzMTI1LCJ5IjoxNDEuMzcwNjQzNDgxNzI2OTJ9LHsieCI6NjcxLjI4MTI1LCJ5IjoxOTF9LHsieCI6NjcxLjI4MTI1LCJ5IjoyMTZ9XQ==' data-look='classic' marker-end='url(%23mermaid-0_flowchart-v2-pointEnd)'/%3e%3cpath d='M1569.195%2c146.023L1523.411%2c153.519C1477.628%2c161.015%2c1386.06%2c176.008%2c1340.276%2c187.004C1294.492%2c198%2c1294.492%2c205%2c1294.492%2c208.5L1294.492%2c212' id='mermaid-0-L_Src_Components_0' class='edge-thickness-normal edge-pattern-solid edge-thickness-normal edge-pattern-solid flowchart-link' style='%3b' data-edge='true' data-et='edge' data-id='L_Src_Components_0' data-points='W3sieCI6MTU2OS4xOTUzMTI1LCJ5IjoxNDYuMDIyNTMyNzE2NzE3NX0seyJ4IjoxMjk0LjQ5MjE4NzUsInkiOjE5MX0seyJ4IjoxMjk0LjQ5MjE4NzUsInkiOjIxNn1d' data-look='classic' marker-end='url(%23mermaid-0_flowchart-v2-pointEnd)'/%3e%3cpath d='M1654.977%2c150.668L1679.686%2c157.39C1704.395%2c164.112%2c1753.813%2c177.556%2c1778.521%2c187.778C1803.23%2c198%2c1803.23%2c205%2c1803.23%2c208.5L1803.23%2c212' id='mermaid-0-L_Src_Content_0' class='edge-thickness-normal edge-pattern-solid edge-thickness-normal edge-pattern-solid flowchart-link' style='%3b' data-edge='true' data-et='edge' data-id='L_Src_Content_0' data-points='W3sieCI6MTY1NC45NzY1NjI1LCJ5IjoxNTAuNjY4MTk5Mzc0NjU1MTN9LHsieCI6MTgwMy4yMzA0Njg3NSwieSI6MTkxfSx7IngiOjE4MDMuMjMwNDY4NzUsInkiOjIxNn1d' data-look='classic' marker-end='url(%23mermaid-0_flowchart-v2-pointEnd)'/%3e%3cpath d='M1654.977%2c142.756L1746.788%2c150.797C1838.599%2c158.838%2c2022.221%2c174.919%2c2114.033%2c186.459C2205.844%2c198%2c2205.844%2c205%2c2205.844%2c208.5L2205.844%2c212' id='mermaid-0-L_Src_Styles_0' class='edge-thickness-normal edge-pattern-solid edge-thickness-normal edge-pattern-solid flowchart-link' style='%3b' data-edge='true' data-et='edge' data-id='L_Src_Styles_0' data-points='W3sieCI6MTY1NC45NzY1NjI1LCJ5IjoxNDIuNzU2MjY2MzY0OTE2MjZ9LHsieCI6MjIwNS44NDM3NSwieSI6MTkxfSx7IngiOjIyMDUuODQzNzUsInkiOjIxNn1d' data-look='classic' marker-end='url(%23mermaid-0_flowchart-v2-pointEnd)'/%3e%3cpath d='M1654.977%2c141.907L1775.72%2c150.089C1896.464%2c158.271%2c2137.951%2c174.636%2c2258.694%2c186.318C2379.438%2c198%2c2379.438%2c205%2c2379.438%2c208.5L2379.438%2c212' id='mermaid-0-L_Src_Assets_0' class='edge-thickness-normal edge-pattern-solid edge-thickness-normal edge-pattern-solid flowchart-link' style='%3b' data-edge='true' data-et='edge' data-id='L_Src_Assets_0' data-points='W3sieCI6MTY1NC45NzY1NjI1LCJ5IjoxNDEuOTA2NTA2NzU1MTc0NTV9LHsieCI6MjM3OS40Mzc1LCJ5IjoxOTF9LHsieCI6MjM3OS40Mzc1LCJ5IjoyMTZ9XQ==' data-look='classic' marker-end='url(%23mermaid-0_flowchart-v2-pointEnd)'/%3e%3cpath d='M161.266%2c264.364L148.354%2c269.47C135.443%2c274.576%2c109.62%2c284.788%2c96.708%2c293.394C83.797%2c302%2c83.797%2c309%2c83.797%2c312.5L83.797%2c316' id='mermaid-0-L_Pages_Blog_0' class='edge-thickness-normal edge-pattern-solid edge-thickness-normal edge-pattern-solid flowchart-link' style='%3b' data-edge='true' data-et='edge' data-id='L_Pages_Blog_0' data-points='W3sieCI6MTYxLjI2NTYyNSwieSI6MjY0LjM2NDE0OTQ4NjA2NzR9LHsieCI6ODMuNzk2ODc1LCJ5IjoyOTV9LHsieCI6ODMuNzk2ODc1LCJ5IjozMjB9XQ==' data-look='classic' marker-end='url(%23mermaid-0_flowchart-v2-pointEnd)'/%3e%3cpath d='M246.382%2c270L251.18%2c274.167C255.979%2c278.333%2c265.575%2c286.667%2c270.374%2c294.333C275.172%2c302%2c275.172%2c309%2c275.172%2c312.5L275.172%2c316' id='mermaid-0-L_Pages_Tags_0' class='edge-thickness-normal edge-pattern-solid edge-thickness-normal edge-pattern-solid flowchart-link' style='%3b' data-edge='true' data-et='edge' data-id='L_Pages_Tags_0' data-points='W3sieCI6MjQ2LjM4MjA2MTI5ODA3NjkzLCJ5IjoyNzB9LHsieCI6Mjc1LjE3MTg3NSwieSI6Mjk1fSx7IngiOjI3NS4xNzE4NzUsInkiOjMyMH1d' data-look='classic' marker-end='url(%23mermaid-0_flowchart-v2-pointEnd)'/%3e%3cpath d='M269.313%2c254.485L301.074%2c261.238C332.836%2c267.99%2c396.359%2c281.495%2c428.121%2c293.748C459.883%2c306%2c459.883%2c317%2c459.883%2c322.5L459.883%2c328' id='mermaid-0-L_Pages_Index_0' class='edge-thickness-normal edge-pattern-solid edge-thickness-normal edge-pattern-solid flowchart-link' style='%3b' data-edge='true' data-et='edge' data-id='L_Pages_Index_0' data-points='W3sieCI6MjY5LjMxMjUsInkiOjI1NC40ODUyNDMzODgyNzEzNn0seyJ4Ijo0NTkuODgyODEyNSwieSI6Mjk1fSx7IngiOjQ1OS44ODI4MTI1LCJ5IjozMzJ9XQ==' data-look='classic' marker-end='url(%23mermaid-0_flowchart-v2-pointEnd)'/%3e%3cpath d='M671.281%2c270L671.281%2c274.167C671.281%2c278.333%2c671.281%2c286.667%2c671.281%2c296.333C671.281%2c306%2c671.281%2c317%2c671.281%2c322.5L671.281%2c328' id='mermaid-0-L_Layouts_Base_0' class='edge-thickness-normal edge-pattern-solid edge-thickness-normal edge-pattern-solid flowchart-link' style='%3b' data-edge='true' data-et='edge' data-id='L_Layouts_Base_0' data-points='W3sieCI6NjcxLjI4MTI1LCJ5IjoyNzB9LHsieCI6NjcxLjI4MTI1LCJ5IjoyOTV9LHsieCI6NjcxLjI4MTI1LCJ5IjozMzJ9XQ==' data-look='classic' marker-end='url(%23mermaid-0_flowchart-v2-pointEnd)'/%3e%3cpath d='M728.852%2c255.056L760.642%2c261.713C792.432%2c268.371%2c856.013%2c281.685%2c887.803%2c293.843C919.594%2c306%2c919.594%2c317%2c919.594%2c322.5L919.594%2c328' id='mermaid-0-L_Layouts_BlogPost_0' class='edge-thickness-normal edge-pattern-solid edge-thickness-normal edge-pattern-solid flowchart-link' style='%3b' data-edge='true' data-et='edge' data-id='L_Layouts_BlogPost_0' data-points='W3sieCI6NzI4Ljg1MTU2MjUsInkiOjI1NS4wNTYwMDMwMjAzODc2fSx7IngiOjkxOS41OTM3NSwieSI6Mjk1fSx7IngiOjkxOS41OTM3NSwieSI6MzMyfV0=' data-look='classic' marker-end='url(%23mermaid-0_flowchart-v2-pointEnd)'/%3e%3cpath d='M1220.218%2c270L1208.756%2c274.167C1197.294%2c278.333%2c1174.369%2c286.667%2c1162.907%2c296.333C1151.445%2c306%2c1151.445%2c317%2c1151.445%2c322.5L1151.445%2c328' id='mermaid-0-L_Components_Header_0' class='edge-thickness-normal edge-pattern-solid edge-thickness-normal edge-pattern-solid flowchart-link' style='%3b' data-edge='true' data-et='edge' data-id='L_Components_Header_0' data-points='W3sieCI6MTIyMC4yMTc4NDg1NTc2OTI0LCJ5IjoyNzB9LHsieCI6MTE1MS40NDUzMTI1LCJ5IjoyOTV9LHsieCI6MTE1MS40NDUzMTI1LCJ5IjozMzJ9XQ==' data-look='classic' marker-end='url(%23mermaid-0_flowchart-v2-pointEnd)'/%3e%3cpath d='M1323.281%2c270L1327.724%2c274.167C1332.167%2c278.333%2c1341.052%2c286.667%2c1345.495%2c296.333C1349.938%2c306%2c1349.938%2c317%2c1349.938%2c322.5L1349.938%2c328' id='mermaid-0-L_Components_Footer_0' class='edge-thickness-normal edge-pattern-solid edge-thickness-normal edge-pattern-solid flowchart-link' style='%3b' data-edge='true' data-et='edge' data-id='L_Components_Footer_0' data-points='W3sieCI6MTMyMy4yODEwOTk3NTk2MTU1LCJ5IjoyNzB9LHsieCI6MTM0OS45Mzc1LCJ5IjoyOTV9LHsieCI6MTM0OS45Mzc1LCJ5IjozMzJ9XQ==' data-look='classic' marker-end='url(%23mermaid-0_flowchart-v2-pointEnd)'/%3e%3cpath d='M1370.297%2c258.829L1399.168%2c264.857C1428.039%2c270.886%2c1485.781%2c282.943%2c1514.652%2c292.471C1543.523%2c302%2c1543.523%2c309%2c1543.523%2c312.5L1543.523%2c316' id='mermaid-0-L_Components_Islands_0' class='edge-thickness-normal edge-pattern-solid edge-thickness-normal edge-pattern-solid flowchart-link' style='%3b' data-edge='true' data-et='edge' data-id='L_Components_Islands_0' data-points='W3sieCI6MTM3MC4yOTY4NzUsInkiOjI1OC44Mjg3MTEyNTYxMTc0Nn0seyJ4IjoxNTQzLjUyMzQzNzUsInkiOjI5NX0seyJ4IjoxNTQzLjUyMzQzNzUsInkiOjMyMH1d' data-look='classic' marker-end='url(%23mermaid-0_flowchart-v2-pointEnd)'/%3e%3cpath d='M1757.354%2c270L1750.274%2c274.167C1743.194%2c278.333%2c1729.035%2c286.667%2c1721.955%2c294.333C1714.875%2c302%2c1714.875%2c309%2c1714.875%2c312.5L1714.875%2c316' id='mermaid-0-L_Content_BlogContent_0' class='edge-thickness-normal edge-pattern-solid edge-thickness-normal edge-pattern-solid flowchart-link' style='%3b' data-edge='true' data-et='edge' data-id='L_Content_BlogContent_0' data-points='W3sieCI6MTc1Ny4zNTM1OTA3NDUxOTI0LCJ5IjoyNzB9LHsieCI6MTcxNC44NzUsInkiOjI5NX0seyJ4IjoxNzE0Ljg3NSwieSI6MzIwfV0=' data-look='classic' marker-end='url(%23mermaid-0_flowchart-v2-pointEnd)'/%3e%3cpath d='M1840.098%2c270L1845.787%2c274.167C1851.477%2c278.333%2c1862.856%2c286.667%2c1868.545%2c294.333C1874.234%2c302%2c1874.234%2c309%2c1874.234%2c312.5L1874.234%2c316' id='mermaid-0-L_Content_Authors_0' class='edge-thickness-normal edge-pattern-solid edge-thickness-normal edge-pattern-solid flowchart-link' style='%3b' data-edge='true' data-et='edge' data-id='L_Content_Authors_0' data-points='W3sieCI6MTg0MC4wOTc4ODE2MTA1NzcsInkiOjI3MH0seyJ4IjoxODc0LjIzNDM3NSwieSI6Mjk1fSx7IngiOjE4NzQuMjM0Mzc1LCJ5IjozMjB9XQ==' data-look='classic' marker-end='url(%23mermaid-0_flowchart-v2-pointEnd)'/%3e%3cpath d='M1861.699%2c256.022L1890.867%2c262.519C1920.034%2c269.015%2c1978.368%2c282.007%2c2007.536%2c292.004C2036.703%2c302%2c2036.703%2c309%2c2036.703%2c312.5L2036.703%2c316' id='mermaid-0-L_Content_Series_0' class='edge-thickness-normal edge-pattern-solid edge-thickness-normal edge-pattern-solid flowchart-link' style='%3b' data-edge='true' data-et='edge' data-id='L_Content_Series_0' data-points='W3sieCI6MTg2MS42OTkyMTg3NSwieSI6MjU2LjAyMjQwMjkxNzkwMDZ9LHsieCI6MjAzNi43MDMxMjUsInkiOjI5NX0seyJ4IjoyMDM2LjcwMzEyNSwieSI6MzIwfV0=' data-look='classic' marker-end='url(%23mermaid-0_flowchart-v2-pointEnd)'/%3e%3cpath d='M2205.844%2c270L2205.844%2c274.167C2205.844%2c278.333%2c2205.844%2c286.667%2c2205.844%2c296.333C2205.844%2c306%2c2205.844%2c317%2c2205.844%2c322.5L2205.844%2c328' id='mermaid-0-L_Styles_Global_0' class='edge-thickness-normal edge-pattern-solid edge-thickness-normal edge-pattern-solid flowchart-link' style='%3b' data-edge='true' data-et='edge' data-id='L_Styles_Global_0' data-points='W3sieCI6MjIwNS44NDM3NSwieSI6MjcwfSx7IngiOjIyMDUuODQzNzUsInkiOjI5NX0seyJ4IjoyMjA1Ljg0Mzc1LCJ5IjozMzJ9XQ==' data-look='classic' marker-end='url(%23mermaid-0_flowchart-v2-pointEnd)'/%3e%3cpath d='M2379.438%2c270L2379.438%2c274.167C2379.438%2c278.333%2c2379.438%2c286.667%2c2379.438%2c294.333C2379.438%2c302%2c2379.438%2c309%2c2379.438%2c312.5L2379.438%2c316' id='mermaid-0-L_Assets_Images_0' class='edge-thickness-normal edge-pattern-solid edge-thickness-normal edge-pattern-solid flowchart-link' style='%3b' data-edge='true' data-et='edge' data-id='L_Assets_Images_0' data-points='W3sieCI6MjM3OS40Mzc1LCJ5IjoyNzB9LHsieCI6MjM3OS40Mzc1LCJ5IjoyOTV9LHsieCI6MjM3OS40Mzc1LCJ5IjozMjB9XQ==' data-look='classic' marker-end='url(%23mermaid-0_flowchart-v2-pointEnd)'/%3e%3c/g%3e%3cg class='edgeLabels'%3e%3cg class='edgeLabel'%3e%3cg class='label' data-id='L_Root_Src_0' transform='translate(0%2c 0)'%3e%3cforeignObject width='0' height='0'%3e%3cdiv xmlns='http://www.w3.org/1999/xhtml' class='labelBkg' style='display: table-cell%3b white-space: nowrap%3b line-height: 1.5%3b max-width: 200px%3b text-align: center%3b'%3e%3cspan class='edgeLabel'%3e%3c/span%3e%3c/div%3e%3c/foreignObject%3e%3c/g%3e%3c/g%3e%3cg class='edgeLabel'%3e%3cg class='label' data-id='L_Root_Public_0' transform='translate(0%2c 0)'%3e%3cforeignObject width='0' height='0'%3e%3cdiv xmlns='http://www.w3.org/1999/xhtml' class='labelBkg' style='display: table-cell%3b white-space: nowrap%3b line-height: 1.5%3b max-width: 200px%3b text-align: center%3b'%3e%3cspan class='edgeLabel'%3e%3c/span%3e%3c/div%3e%3c/foreignObject%3e%3c/g%3e%3c/g%3e%3cg class='edgeLabel'%3e%3cg class='label' data-id='L_Root_Scripts_0' transform='translate(0%2c 0)'%3e%3cforeignObject width='0' height='0'%3e%3cdiv xmlns='http://www.w3.org/1999/xhtml' class='labelBkg' style='display: table-cell%3b white-space: nowrap%3b line-height: 1.5%3b max-width: 200px%3b text-align: center%3b'%3e%3cspan class='edgeLabel'%3e%3c/span%3e%3c/div%3e%3c/foreignObject%3e%3c/g%3e%3c/g%3e%3cg class='edgeLabel'%3e%3cg class='label' data-id='L_Src_Pages_0' transform='translate(0%2c 0)'%3e%3cforeignObject width='0' height='0'%3e%3cdiv xmlns='http://www.w3.org/1999/xhtml' class='labelBkg' style='display: table-cell%3b white-space: nowrap%3b line-height: 1.5%3b max-width: 200px%3b text-align: center%3b'%3e%3cspan class='edgeLabel'%3e%3c/span%3e%3c/div%3e%3c/foreignObject%3e%3c/g%3e%3c/g%3e%3cg class='edgeLabel'%3e%3cg class='label' data-id='L_Src_Layouts_0' transform='translate(0%2c 0)'%3e%3cforeignObject width='0' height='0'%3e%3cdiv xmlns='http://www.w3.org/1999/xhtml' class='labelBkg' style='display: table-cell%3b white-space: nowrap%3b line-height: 1.5%3b max-width: 200px%3b text-align: center%3b'%3e%3cspan class='edgeLabel'%3e%3c/span%3e%3c/div%3e%3c/foreignObject%3e%3c/g%3e%3c/g%3e%3cg class='edgeLabel'%3e%3cg class='label' data-id='L_Src_Components_0' transform='translate(0%2c 0)'%3e%3cforeignObject width='0' height='0'%3e%3cdiv xmlns='http://www.w3.org/1999/xhtml' class='labelBkg' style='display: table-cell%3b white-space: nowrap%3b line-height: 1.5%3b max-width: 200px%3b text-align: center%3b'%3e%3cspan class='edgeLabel'%3e%3c/span%3e%3c/div%3e%3c/foreignObject%3e%3c/g%3e%3c/g%3e%3cg class='edgeLabel'%3e%3cg class='label' data-id='L_Src_Content_0' transform='translate(0%2c 0)'%3e%3cforeignObject width='0' height='0'%3e%3cdiv xmlns='http://www.w3.org/1999/xhtml' class='labelBkg' style='display: table-cell%3b white-space: nowrap%3b line-height: 1.5%3b max-width: 200px%3b text-align: center%3b'%3e%3cspan class='edgeLabel'%3e%3c/span%3e%3c/div%3e%3c/foreignObject%3e%3c/g%3e%3c/g%3e%3cg class='edgeLabel'%3e%3cg class='label' data-id='L_Src_Styles_0' transform='translate(0%2c 0)'%3e%3cforeignObject width='0' height='0'%3e%3cdiv xmlns='http://www.w3.org/1999/xhtml' class='labelBkg' style='display: table-cell%3b white-space: nowrap%3b line-height: 1.5%3b max-width: 200px%3b text-align: center%3b'%3e%3cspan class='edgeLabel'%3e%3c/span%3e%3c/div%3e%3c/foreignObject%3e%3c/g%3e%3c/g%3e%3cg class='edgeLabel'%3e%3cg class='label' data-id='L_Src_Assets_0' transform='translate(0%2c 0)'%3e%3cforeignObject width='0' height='0'%3e%3cdiv xmlns='http://www.w3.org/1999/xhtml' class='labelBkg' style='display: table-cell%3b white-space: nowrap%3b line-height: 1.5%3b max-width: 200px%3b text-align: center%3b'%3e%3cspan class='edgeLabel'%3e%3c/span%3e%3c/div%3e%3c/foreignObject%3e%3c/g%3e%3c/g%3e%3cg class='edgeLabel'%3e%3cg class='label' data-id='L_Pages_Blog_0' transform='translate(0%2c 0)'%3e%3cforeignObject width='0' height='0'%3e%3cdiv xmlns='http://www.w3.org/1999/xhtml' class='labelBkg' style='display: table-cell%3b white-space: nowrap%3b line-height: 1.5%3b max-width: 200px%3b text-align: center%3b'%3e%3cspan class='edgeLabel'%3e%3c/span%3e%3c/div%3e%3c/foreignObject%3e%3c/g%3e%3c/g%3e%3cg class='edgeLabel'%3e%3cg class='label' data-id='L_Pages_Tags_0' transform='translate(0%2c 0)'%3e%3cforeignObject width='0' height='0'%3e%3cdiv xmlns='http://www.w3.org/1999/xhtml' class='labelBkg' style='display: table-cell%3b white-space: nowrap%3b line-height: 1.5%3b max-width: 200px%3b text-align: center%3b'%3e%3cspan class='edgeLabel'%3e%3c/span%3e%3c/div%3e%3c/foreignObject%3e%3c/g%3e%3c/g%3e%3cg class='edgeLabel'%3e%3cg class='label' data-id='L_Pages_Index_0' transform='translate(0%2c 0)'%3e%3cforeignObject width='0' height='0'%3e%3cdiv xmlns='http://www.w3.org/1999/xhtml' class='labelBkg' style='display: table-cell%3b white-space: nowrap%3b line-height: 1.5%3b max-width: 200px%3b text-align: center%3b'%3e%3cspan class='edgeLabel'%3e%3c/span%3e%3c/div%3e%3c/foreignObject%3e%3c/g%3e%3c/g%3e%3cg class='edgeLabel'%3e%3cg class='label' data-id='L_Layouts_Base_0' transform='translate(0%2c 0)'%3e%3cforeignObject width='0' height='0'%3e%3cdiv xmlns='http://www.w3.org/1999/xhtml' class='labelBkg' style='display: table-cell%3b white-space: nowrap%3b line-height: 1.5%3b max-width: 200px%3b text-align: center%3b'%3e%3cspan class='edgeLabel'%3e%3c/span%3e%3c/div%3e%3c/foreignObject%3e%3c/g%3e%3c/g%3e%3cg class='edgeLabel'%3e%3cg class='label' data-id='L_Layouts_BlogPost_0' transform='translate(0%2c 0)'%3e%3cforeignObject width='0' height='0'%3e%3cdiv xmlns='http://www.w3.org/1999/xhtml' class='labelBkg' style='display: table-cell%3b white-space: nowrap%3b line-height: 1.5%3b max-width: 200px%3b text-align: center%3b'%3e%3cspan class='edgeLabel'%3e%3c/span%3e%3c/div%3e%3c/foreignObject%3e%3c/g%3e%3c/g%3e%3cg class='edgeLabel'%3e%3cg class='label' data-id='L_Components_Header_0' transform='translate(0%2c 0)'%3e%3cforeignObject width='0' height='0'%3e%3cdiv xmlns='http://www.w3.org/1999/xhtml' class='labelBkg' style='display: table-cell%3b white-space: nowrap%3b line-height: 1.5%3b max-width: 200px%3b text-align: center%3b'%3e%3cspan class='edgeLabel'%3e%3c/span%3e%3c/div%3e%3c/foreignObject%3e%3c/g%3e%3c/g%3e%3cg class='edgeLabel'%3e%3cg class='label' data-id='L_Components_Footer_0' transform='translate(0%2c 0)'%3e%3cforeignObject width='0' height='0'%3e%3cdiv xmlns='http://www.w3.org/1999/xhtml' class='labelBkg' style='display: table-cell%3b white-space: nowrap%3b line-height: 1.5%3b max-width: 200px%3b text-align: center%3b'%3e%3cspan class='edgeLabel'%3e%3c/span%3e%3c/div%3e%3c/foreignObject%3e%3c/g%3e%3c/g%3e%3cg class='edgeLabel'%3e%3cg class='label' data-id='L_Components_Islands_0' transform='translate(0%2c 0)'%3e%3cforeignObject width='0' height='0'%3e%3cdiv xmlns='http://www.w3.org/1999/xhtml' class='labelBkg' style='display: table-cell%3b white-space: nowrap%3b line-height: 1.5%3b max-width: 200px%3b text-align: center%3b'%3e%3cspan class='edgeLabel'%3e%3c/span%3e%3c/div%3e%3c/foreignObject%3e%3c/g%3e%3c/g%3e%3cg class='edgeLabel'%3e%3cg class='label' data-id='L_Content_BlogContent_0' transform='translate(0%2c 0)'%3e%3cforeignObject width='0' height='0'%3e%3cdiv xmlns='http://www.w3.org/1999/xhtml' class='labelBkg' style='display: table-cell%3b white-space: nowrap%3b line-height: 1.5%3b max-width: 200px%3b text-align: center%3b'%3e%3cspan class='edgeLabel'%3e%3c/span%3e%3c/div%3e%3c/foreignObject%3e%3c/g%3e%3c/g%3e%3cg class='edgeLabel'%3e%3cg class='label' data-id='L_Content_Authors_0' transform='translate(0%2c 0)'%3e%3cforeignObject width='0' height='0'%3e%3cdiv xmlns='http://www.w3.org/1999/xhtml' class='labelBkg' style='display: table-cell%3b white-space: nowrap%3b line-height: 1.5%3b max-width: 200px%3b text-align: center%3b'%3e%3cspan class='edgeLabel'%3e%3c/span%3e%3c/div%3e%3c/foreignObject%3e%3c/g%3e%3c/g%3e%3cg class='edgeLabel'%3e%3cg class='label' data-id='L_Content_Series_0' transform='translate(0%2c 0)'%3e%3cforeignObject width='0' height='0'%3e%3cdiv xmlns='http://www.w3.org/1999/xhtml' class='labelBkg' style='display: table-cell%3b white-space: nowrap%3b line-height: 1.5%3b max-width: 200px%3b text-align: center%3b'%3e%3cspan class='edgeLabel'%3e%3c/span%3e%3c/div%3e%3c/foreignObject%3e%3c/g%3e%3c/g%3e%3cg class='edgeLabel'%3e%3cg class='label' data-id='L_Styles_Global_0' transform='translate(0%2c 0)'%3e%3cforeignObject width='0' height='0'%3e%3cdiv xmlns='http://www.w3.org/1999/xhtml' class='labelBkg' style='display: table-cell%3b white-space: nowrap%3b line-height: 1.5%3b max-width: 200px%3b text-align: center%3b'%3e%3cspan class='edgeLabel'%3e%3c/span%3e%3c/div%3e%3c/foreignObject%3e%3c/g%3e%3c/g%3e%3cg class='edgeLabel'%3e%3cg class='label' data-id='L_Assets_Images_0' transform='translate(0%2c 0)'%3e%3cforeignObject width='0' height='0'%3e%3cdiv xmlns='http://www.w3.org/1999/xhtml' class='labelBkg' style='display: table-cell%3b white-space: nowrap%3b line-height: 1.5%3b max-width: 200px%3b text-align: center%3b'%3e%3cspan class='edgeLabel'%3e%3c/span%3e%3c/div%3e%3c/foreignObject%3e%3c/g%3e%3c/g%3e%3c/g%3e%3cg class='nodes'%3e%3cg class='node default' id='mermaid-0-flowchart-Root-0' data-look='classic' transform='translate(1758.1015625%2c 35)'%3e%3crect class='basic label-container' style='fill:%23f5f0e8 !important%3bstroke:%238B7355 !important' x='-62.90625' y='-27' width='125.8125' height='54'/%3e%3cg class='label' style='' transform='translate(-32.90625%2c -12)'%3e%3crect/%3e%3cforeignObject width='65.8125' height='24'%3e%3cdiv xmlns='http://www.w3.org/1999/xhtml' style='display: table-cell%3b white-space: nowrap%3b line-height: 1.5%3b max-width: 200px%3b text-align: center%3b'%3e%3cspan class='nodeLabel'%3e%3cp%3eblogcraft/%3c/p%3e%3c/span%3e%3c/div%3e%3c/foreignObject%3e%3c/g%3e%3c/g%3e%3cg class='node default' id='mermaid-0-flowchart-Src-1' data-look='classic' transform='translate(1612.0859375%2c 139)'%3e%3crect class='basic label-container' style='fill:%23e8f0f5 !important%3bstroke:%234A7B8C !important' x='-42.890625' y='-27' width='85.78125' height='54'/%3e%3cg class='label' style='' transform='translate(-12.890625%2c -12)'%3e%3crect/%3e%3cforeignObject width='25.78125' height='24'%3e%3cdiv xmlns='http://www.w3.org/1999/xhtml' style='display: table-cell%3b white-space: nowrap%3b line-height: 1.5%3b max-width: 200px%3b text-align: center%3b'%3e%3cspan class='nodeLabel'%3e%3cp%3esrc/%3c/p%3e%3c/span%3e%3c/div%3e%3c/foreignObject%3e%3c/g%3e%3c/g%3e%3cg class='node default' id='mermaid-0-flowchart-Public-3' data-look='classic' transform='translate(1758.1015625%2c 139)'%3e%3crect class='basic label-container' style='' x='-53.125' y='-27' width='106.25' height='54'/%3e%3cg class='label' style='' transform='translate(-23.125%2c -12)'%3e%3crect/%3e%3cforeignObject width='46.25' height='24'%3e%3cdiv xmlns='http://www.w3.org/1999/xhtml' style='display: table-cell%3b white-space: nowrap%3b line-height: 1.5%3b max-width: 200px%3b text-align: center%3b'%3e%3cspan class='nodeLabel'%3e%3cp%3epublic/%3c/p%3e%3c/span%3e%3c/div%3e%3c/foreignObject%3e%3c/g%3e%3c/g%3e%3cg class='node default' id='mermaid-0-flowchart-Scripts-5' data-look='classic' transform='translate(1916.5625%2c 139)'%3e%3crect class='basic label-container' style='' x='-55.3359375' y='-27' width='110.671875' height='54'/%3e%3cg class='label' style='' transform='translate(-25.3359375%2c -12)'%3e%3crect/%3e%3cforeignObject width='50.671875' height='24'%3e%3cdiv xmlns='http://www.w3.org/1999/xhtml' style='display: table-cell%3b white-space: nowrap%3b line-height: 1.5%3b max-width: 200px%3b text-align: center%3b'%3e%3cspan class='nodeLabel'%3e%3cp%3escripts/%3c/p%3e%3c/span%3e%3c/div%3e%3c/foreignObject%3e%3c/g%3e%3c/g%3e%3cg class='node default' id='mermaid-0-flowchart-Pages-7' data-look='classic' transform='translate(215.2890625%2c 243)'%3e%3crect class='basic label-container' style='fill:%23e8f5e8 !important%3bstroke:%234A8C5C !important' x='-54.0234375' y='-27' width='108.046875' height='54'/%3e%3cg class='label' style='' transform='translate(-24.0234375%2c -12)'%3e%3crect/%3e%3cforeignObject width='48.046875' height='24'%3e%3cdiv xmlns='http://www.w3.org/1999/xhtml' style='display: table-cell%3b white-space: nowrap%3b line-height: 1.5%3b max-width: 200px%3b text-align: center%3b'%3e%3cspan class='nodeLabel'%3e%3cp%3epages/%3c/p%3e%3c/span%3e%3c/div%3e%3c/foreignObject%3e%3c/g%3e%3c/g%3e%3cg class='node default' id='mermaid-0-flowchart-Layouts-9' data-look='classic' transform='translate(671.28125%2c 243)'%3e%3crect class='basic label-container' style='' x='-57.5703125' y='-27' width='115.140625' height='54'/%3e%3cg class='label' style='' transform='translate(-27.5703125%2c -12)'%3e%3crect/%3e%3cforeignObject width='55.140625' height='24'%3e%3cdiv xmlns='http://www.w3.org/1999/xhtml' style='display: table-cell%3b white-space: nowrap%3b line-height: 1.5%3b max-width: 200px%3b text-align: center%3b'%3e%3cspan class='nodeLabel'%3e%3cp%3elayouts/%3c/p%3e%3c/span%3e%3c/div%3e%3c/foreignObject%3e%3c/g%3e%3c/g%3e%3cg class='node default' id='mermaid-0-flowchart-Components-11' data-look='classic' transform='translate(1294.4921875%2c 243)'%3e%3crect class='basic label-container' style='fill:%23e8f5e8 !important%3bstroke:%234A8C5C !important' x='-75.8046875' y='-27' width='151.609375' height='54'/%3e%3cg class='label' style='' transform='translate(-45.8046875%2c -12)'%3e%3crect/%3e%3cforeignObject width='91.609375' height='24'%3e%3cdiv xmlns='http://www.w3.org/1999/xhtml' style='display: table-cell%3b white-space: nowrap%3b line-height: 1.5%3b max-width: 200px%3b text-align: center%3b'%3e%3cspan class='nodeLabel'%3e%3cp%3ecomponents/%3c/p%3e%3c/span%3e%3c/div%3e%3c/foreignObject%3e%3c/g%3e%3c/g%3e%3cg class='node default' id='mermaid-0-flowchart-Content-13' data-look='classic' transform='translate(1803.23046875%2c 243)'%3e%3crect class='basic label-container' style='fill:%23f5e8f0 !important%3bstroke:%238C4A7B !important' x='-58.46875' y='-27' width='116.9375' height='54'/%3e%3cg class='label' style='' transform='translate(-28.46875%2c -12)'%3e%3crect/%3e%3cforeignObject width='56.9375' height='24'%3e%3cdiv xmlns='http://www.w3.org/1999/xhtml' style='display: table-cell%3b white-space: nowrap%3b line-height: 1.5%3b max-width: 200px%3b text-align: center%3b'%3e%3cspan class='nodeLabel'%3e%3cp%3econtent/%3c/p%3e%3c/span%3e%3c/div%3e%3c/foreignObject%3e%3c/g%3e%3c/g%3e%3cg class='node default' id='mermaid-0-flowchart-Styles-15' data-look='classic' transform='translate(2205.84375%2c 243)'%3e%3crect class='basic label-container' style='fill:%23f5f0e8 !important%3bstroke:%238B7355 !important' x='-52.671875' y='-27' width='105.34375' height='54'/%3e%3cg class='label' style='' transform='translate(-22.671875%2c -12)'%3e%3crect/%3e%3cforeignObject width='45.34375' height='24'%3e%3cdiv xmlns='http://www.w3.org/1999/xhtml' style='display: table-cell%3b white-space: nowrap%3b line-height: 1.5%3b max-width: 200px%3b text-align: center%3b'%3e%3cspan class='nodeLabel'%3e%3cp%3estyles/%3c/p%3e%3c/span%3e%3c/div%3e%3c/foreignObject%3e%3c/g%3e%3c/g%3e%3cg class='node default' id='mermaid-0-flowchart-Assets-17' data-look='classic' transform='translate(2379.4375%2c 243)'%3e%3crect class='basic label-container' style='' x='-55.34375' y='-27' width='110.6875' height='54'/%3e%3cg class='label' style='' transform='translate(-25.34375%2c -12)'%3e%3crect/%3e%3cforeignObject width='50.6875' height='24'%3e%3cdiv xmlns='http://www.w3.org/1999/xhtml' style='display: table-cell%3b white-space: nowrap%3b line-height: 1.5%3b max-width: 200px%3b text-align: center%3b'%3e%3cspan class='nodeLabel'%3e%3cp%3eassets/%3c/p%3e%3c/span%3e%3c/div%3e%3c/foreignObject%3e%3c/g%3e%3c/g%3e%3cg class='node default' id='mermaid-0-flowchart-Blog-19' data-look='classic' transform='translate(83.796875%2c 359)'%3e%3crect class='basic label-container' style='' x='-75.796875' y='-39' width='151.59375' height='78'/%3e%3cg class='label' style='' transform='translate(-45.796875%2c -24)'%3e%3crect/%3e%3cforeignObject width='91.59375' height='48'%3e%3cdiv xmlns='http://www.w3.org/1999/xhtml' style='display: table-cell%3b white-space: nowrap%3b line-height: 1.5%3b max-width: 200px%3b text-align: center%3b'%3e%3cspan class='nodeLabel'%3e%3cp%3eblog/%3cbr /%3e%5b...slug%5d.astro%3c/p%3e%3c/span%3e%3c/div%3e%3c/foreignObject%3e%3c/g%3e%3c/g%3e%3cg class='node default' id='mermaid-0-flowchart-Tags-21' data-look='classic' transform='translate(275.171875%2c 359)'%3e%3crect class='basic label-container' style='' x='-65.578125' y='-39' width='131.15625' height='78'/%3e%3cg class='label' style='' transform='translate(-35.578125%2c -24)'%3e%3crect/%3e%3cforeignObject width='71.15625' height='48'%3e%3cdiv xmlns='http://www.w3.org/1999/xhtml' style='display: table-cell%3b white-space: nowrap%3b line-height: 1.5%3b max-width: 200px%3b text-align: center%3b'%3e%3cspan class='nodeLabel'%3e%3cp%3etags/%3cbr /%3e%5btag%5d.astro%3c/p%3e%3c/span%3e%3c/div%3e%3c/foreignObject%3e%3c/g%3e%3c/g%3e%3cg class='node default' id='mermaid-0-flowchart-Index-23' data-look='classic' transform='translate(459.8828125%2c 359)'%3e%3crect class='basic label-container' style='' x='-69.1328125' y='-27' width='138.265625' height='54'/%3e%3cg class='label' style='' transform='translate(-39.1328125%2c -12)'%3e%3crect/%3e%3cforeignObject width='78.265625' height='24'%3e%3cdiv xmlns='http://www.w3.org/1999/xhtml' style='display: table-cell%3b white-space: nowrap%3b line-height: 1.5%3b max-width: 200px%3b text-align: center%3b'%3e%3cspan class='nodeLabel'%3e%3cp%3eindex.astro%3c/p%3e%3c/span%3e%3c/div%3e%3c/foreignObject%3e%3c/g%3e%3c/g%3e%3cg class='node default' id='mermaid-0-flowchart-Base-25' data-look='classic' transform='translate(671.28125%2c 359)'%3e%3crect class='basic label-container' style='' x='-92.265625' y='-27' width='184.53125' height='54'/%3e%3cg class='label' style='' transform='translate(-62.265625%2c -12)'%3e%3crect/%3e%3cforeignObject width='124.53125' height='24'%3e%3cdiv xmlns='http://www.w3.org/1999/xhtml' style='display: table-cell%3b white-space: nowrap%3b line-height: 1.5%3b max-width: 200px%3b text-align: center%3b'%3e%3cspan class='nodeLabel'%3e%3cp%3eBaseLayout.astro%3c/p%3e%3c/span%3e%3c/div%3e%3c/foreignObject%3e%3c/g%3e%3c/g%3e%3cg class='node default' id='mermaid-0-flowchart-BlogPost-27' data-look='classic' transform='translate(919.59375%2c 359)'%3e%3crect class='basic label-container' style='' x='-106.046875' y='-27' width='212.09375' height='54'/%3e%3cg class='label' style='' transform='translate(-76.046875%2c -12)'%3e%3crect/%3e%3cforeignObject width='152.09375' height='24'%3e%3cdiv xmlns='http://www.w3.org/1999/xhtml' style='display: table-cell%3b white-space: nowrap%3b line-height: 1.5%3b max-width: 200px%3b text-align: center%3b'%3e%3cspan class='nodeLabel'%3e%3cp%3eBlogPostLayout.astro%3c/p%3e%3c/span%3e%3c/div%3e%3c/foreignObject%3e%3c/g%3e%3c/g%3e%3cg class='node default' id='mermaid-0-flowchart-Header-29' data-look='classic' transform='translate(1151.4453125%2c 359)'%3e%3crect class='basic label-container' style='' x='-75.8046875' y='-27' width='151.609375' height='54'/%3e%3cg class='label' style='' transform='translate(-45.8046875%2c -12)'%3e%3crect/%3e%3cforeignObject width='91.609375' height='24'%3e%3cdiv xmlns='http://www.w3.org/1999/xhtml' style='display: table-cell%3b white-space: nowrap%3b line-height: 1.5%3b max-width: 200px%3b text-align: center%3b'%3e%3cspan class='nodeLabel'%3e%3cp%3eHeader.astro%3c/p%3e%3c/span%3e%3c/div%3e%3c/foreignObject%3e%3c/g%3e%3c/g%3e%3cg class='node default' id='mermaid-0-flowchart-Footer-31' data-look='classic' transform='translate(1349.9375%2c 359)'%3e%3crect class='basic label-container' style='' x='-72.6875' y='-27' width='145.375' height='54'/%3e%3cg class='label' style='' transform='translate(-42.6875%2c -12)'%3e%3crect/%3e%3cforeignObject width='85.375' height='24'%3e%3cdiv xmlns='http://www.w3.org/1999/xhtml' style='display: table-cell%3b white-space: nowrap%3b line-height: 1.5%3b max-width: 200px%3b text-align: center%3b'%3e%3cspan class='nodeLabel'%3e%3cp%3eFooter.astro%3c/p%3e%3c/span%3e%3c/div%3e%3c/foreignObject%3e%3c/g%3e%3c/g%3e%3cg class='node default' id='mermaid-0-flowchart-Islands-33' data-look='classic' transform='translate(1543.5234375%2c 359)'%3e%3crect class='basic label-container' style='' x='-70.8984375' y='-39' width='141.796875' height='78'/%3e%3cg class='label' style='' transform='translate(-40.8984375%2c -24)'%3e%3crect/%3e%3cforeignObject width='81.796875' height='48'%3e%3cdiv xmlns='http://www.w3.org/1999/xhtml' style='display: table-cell%3b white-space: nowrap%3b line-height: 1.5%3b max-width: 200px%3b text-align: center%3b'%3e%3cspan class='nodeLabel'%3e%3cp%3eislands/%3cbr /%3e(React .tsx)%3c/p%3e%3c/span%3e%3c/div%3e%3c/foreignObject%3e%3c/g%3e%3c/g%3e%3cg class='node default' id='mermaid-0-flowchart-BlogContent-35' data-look='classic' transform='translate(1714.875%2c 359)'%3e%3crect class='basic label-container' style='' x='-50.453125' y='-39' width='100.90625' height='78'/%3e%3cg class='label' style='' transform='translate(-20.453125%2c -24)'%3e%3crect/%3e%3cforeignObject width='40.90625' height='48'%3e%3cdiv xmlns='http://www.w3.org/1999/xhtml' style='display: table-cell%3b white-space: nowrap%3b line-height: 1.5%3b max-width: 200px%3b text-align: center%3b'%3e%3cspan class='nodeLabel'%3e%3cp%3eblog/%3cbr /%3e*.mdx%3c/p%3e%3c/span%3e%3c/div%3e%3c/foreignObject%3e%3c/g%3e%3c/g%3e%3cg class='node default' id='mermaid-0-flowchart-Authors-37' data-look='classic' transform='translate(1874.234375%2c 359)'%3e%3crect class='basic label-container' style='' x='-58.90625' y='-39' width='117.8125' height='78'/%3e%3cg class='label' style='' transform='translate(-28.90625%2c -24)'%3e%3crect/%3e%3cforeignObject width='57.8125' height='48'%3e%3cdiv xmlns='http://www.w3.org/1999/xhtml' style='display: table-cell%3b white-space: nowrap%3b line-height: 1.5%3b max-width: 200px%3b text-align: center%3b'%3e%3cspan class='nodeLabel'%3e%3cp%3eauthors/%3cbr /%3e*.json%3c/p%3e%3c/span%3e%3c/div%3e%3c/foreignObject%3e%3c/g%3e%3c/g%3e%3cg class='node default' id='mermaid-0-flowchart-Series-39' data-look='classic' transform='translate(2036.703125%2c 359)'%3e%3crect class='basic label-container' style='' x='-53.5625' y='-39' width='107.125' height='78'/%3e%3cg class='label' style='' transform='translate(-23.5625%2c -24)'%3e%3crect/%3e%3cforeignObject width='47.125' height='48'%3e%3cdiv xmlns='http://www.w3.org/1999/xhtml' style='display: table-cell%3b white-space: nowrap%3b line-height: 1.5%3b max-width: 200px%3b text-align: center%3b'%3e%3cspan class='nodeLabel'%3e%3cp%3eseries/%3cbr /%3e*.yaml%3c/p%3e%3c/span%3e%3c/div%3e%3c/foreignObject%3e%3c/g%3e%3c/g%3e%3cg class='node default' id='mermaid-0-flowchart-Global-41' data-look='classic' transform='translate(2205.84375%2c 359)'%3e%3crect class='basic label-container' style='' x='-65.578125' y='-27' width='131.15625' height='54'/%3e%3cg class='label' style='' transform='translate(-35.578125%2c -12)'%3e%3crect/%3e%3cforeignObject width='71.15625' height='24'%3e%3cdiv xmlns='http://www.w3.org/1999/xhtml' style='display: table-cell%3b white-space: nowrap%3b line-height: 1.5%3b max-width: 200px%3b text-align: center%3b'%3e%3cspan class='nodeLabel'%3e%3cp%3eglobal.css%3c/p%3e%3c/span%3e%3c/div%3e%3c/foreignObject%3e%3c/g%3e%3c/g%3e%3cg class='node default' id='mermaid-0-flowchart-Images-43' data-look='classic' transform='translate(2379.4375%2c 359)'%3e%3crect class='basic label-container' style='' x='-58.015625' y='-39' width='116.03125' height='78'/%3e%3cg class='label' style='' transform='translate(-28.015625%2c -24)'%3e%3crect/%3e%3cforeignObject width='56.03125' height='48'%3e%3cdiv xmlns='http://www.w3.org/1999/xhtml' style='display: table-cell%3b white-space: nowrap%3b line-height: 1.5%3b max-width: 200px%3b text-align: center%3b'%3e%3cspan class='nodeLabel'%3e%3cp%3eimages/%3cbr /%3eheroes/%3c/p%3e%3c/span%3e%3c/div%3e%3c/foreignObject%3e%3c/g%3e%3c/g%3e%3c/g%3e%3c/g%3e%3c/g%3e%3cdefs%3e%3cfilter id='mermaid-0-drop-shadow' height='130%25' width='130%25'%3e%3cfeDropShadow dx='4' dy='4' stdDeviation='0' flood-opacity='0.06' flood-color='black'/%3e%3c/filter%3e%3c/defs%3e%3cdefs%3e%3cfilter id='mermaid-0-drop-shadow-small' height='150%25' width='150%25'%3e%3cfeDropShadow dx='2' dy='2' stdDeviation='0' flood-opacity='0.06' flood-color='black'/%3e%3c/filter%3e%3c/defs%3e%3clinearGradient id='mermaid-0-gradient' gradientUnits='objectBoundingBox' x1='0%25' y1='0%25' x2='100%25' y2='0%25'%3e%3cstop offset='0%25' stop-color='hsl(0%2c 0%25%2c 83.3333333333%25)' stop-opacity='1'/%3e%3cstop offset='100%25' stop-color='hsl(0%2c 0%25%2c 88.9215686275%25)' stop-opacity='1'/%3e%3c/linearGradient%3e%3c/svg%3e)
Create this structure now:
mkdir -p src/{layouts,components/islands,content/{blog,authors,series},styles,assets/images/heroes}mkdir -p scripts publicThe key insight: .astro files are static components. They render at build time, produce zero JavaScript, and use <slot /> for composition. React .tsx files live in components/islands/ — the name is a constant reminder that these are interactive islands, not default building blocks.
Step 3: Tailwind CSS 4 Setup
Tailwind CSS 4 changed everything about configuration. There is no tailwind.config.js. There is no @astrojs/tailwind integration. The entire configuration lives in CSS.
Install the dependencies:
pnpm add tailwindcss @tailwindcss/vitenpm install tailwindcss @tailwindcss/viteyarn add tailwindcss @tailwindcss/viteCreate the global stylesheet with design tokens defined in a CSS-first @theme block:
@import "tailwindcss";
@theme {  /* Typography */  --font-serif: "Source Serif 4 Variable", "Georgia", serif;  --font-sans: "Satoshi", system-ui, sans-serif;  --font-mono: "JetBrains Mono Variable", "Fira Code", monospace;
  /* Spacing scale */  --spacing-prose: clamp(1rem, 5vw, 3rem);
  /* Radius */  --radius-sm: 0.25rem;  --radius-md: 0.5rem;  --radius-lg: 0.75rem;}
/* Light theme (default) */:root {  --color-bg: #faf8f5;  --color-bg-surface: #ffffff;  --color-text: #1a1a1a;  --color-text-muted: #6b6b6b;  --color-border: #e5e0d8;  --color-accent: #0D6B6E;  --color-accent-hover: #0a5456;}
/* Dark theme */[data-theme="dark"] {  --color-bg: #1a1a1a;  --color-bg-surface: #262626;  --color-text: #e8e4df;  --color-text-muted: #9a9a9a;  --color-border: #3a3a3a;  --color-accent: #2dd4bf;  --color-accent-hover: #5eead4;}
body {  font-family: var(--font-serif);  background-color: var(--color-bg);  color: var(--color-text);}
Every color in every component references these CSS variables. When dark mode activates via the data-theme attribute on <html>, every color flips automatically. No conditional classes, no JavaScript color calculations.
Step 4: Font Setup
Self-hosted fonts eliminate FOUT (Flash of Unstyled Text) and avoid third-party network requests. We use three typefaces: Source Serif 4 for body text, JetBrains Mono for code, and Satoshi for headings.
pnpm add @fontsource-variable/source-serif-4 @fontsource-variable/jetbrains-mononpm install @fontsource-variable/source-serif-4 @fontsource-variable/jetbrains-monoyarn add @fontsource-variable/source-serif-4 @fontsource-variable/jetbrains-monoSatoshi is not on Fontsource. Download the WOFF2 files from Fontshare, verify the license permits web use, and place them in public/fonts/. Register them with a @font-face declaration in global.css:
@font-face { font-family: "Satoshi"; src: url("/fonts/Satoshi-Variable.woff2") format("woff2"); font-weight: 300 900; font-display: swap;}Import the Fontsource packages in your base layout (covered in Step 6). The font-display: swap directive ensures text remains visible during font loading — a Core Web Vitals requirement.
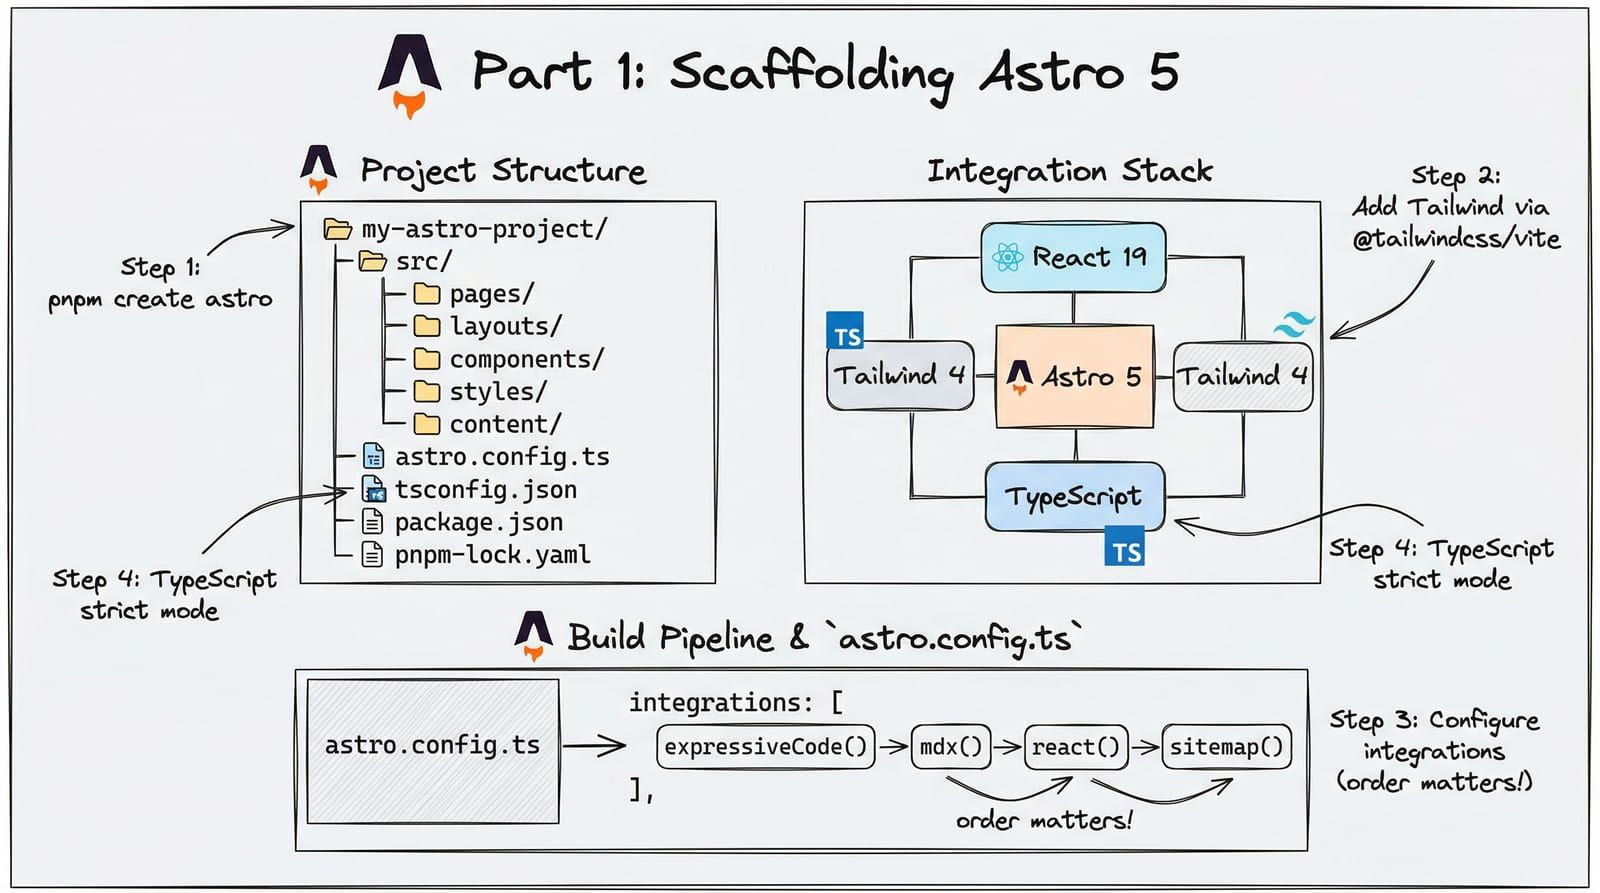
Step 5: astro.config.ts — The Full Production Configuration
This is where integration order matters. Expressive Code must register before @astrojs/mdx. The rehype-mermaid plugin needs Playwright’s Chromium installed. The Tailwind Vite plugin replaces the old Astro integration.
import { defineConfig } from 'astro/config';import tailwindcss from '@tailwindcss/vite';import expressiveCode from 'astro-expressive-code';import mdx from '@astrojs/mdx';import react from '@astrojs/react';import sitemap from '@astrojs/sitemap';import cloudflare from '@astrojs/cloudflare';import rehypeSlug from 'rehype-slug';import rehypeAutolinkHeadings from 'rehype-autolink-headings';import rehypeMermaid from 'rehype-mermaid';import remarkGfm from 'remark-gfm';
export default defineConfig({  site: 'https://master.blogcraft.pages.dev',  output: 'static',  adapter: cloudflare(),
  integrations: [    // ORDER MATTERS: Expressive Code BEFORE mdx    expressiveCode({      themes: ['github-light', 'github-dark'],    }),    mdx(),    react(),    sitemap(),  ],
  markdown: {    remarkPlugins: [remarkGfm],    rehypePlugins: [      rehypeSlug,      [rehypeAutolinkHeadings, { behavior: 'wrap' }],      [rehypeMermaid, { strategy: 'img-svg', dark: true }],    ],  },
vite: { plugins: [tailwindcss()], },});Step 6: BaseLayout.astro — The Root Shell
Every page on the site renders through a single root layout. It imports the global stylesheet exactly once, sets up the HTML document structure, and provides a <slot /> for page content.
---import '@fontsource-variable/source-serif-4';import '@fontsource-variable/jetbrains-mono';import '@/styles/global.css';
interface Props {  title: string;  description: string;  image?: string;}
const { title, description, image = '/og/default.png' } = Astro.props;const canonicalURL = new URL(Astro.url.pathname, Astro.site);---
<!DOCTYPE html><html lang="en">  <head>    <meta charset="UTF-8" />    <meta name="viewport" content="width=device-width, initial-scale=1.0" />    <link rel="canonical" href={canonicalURL} />    <title>{title}</title>    <meta name="description" content={description} />    <meta property="og:title" content={title} />    <meta property="og:description" content={description} />    <meta property="og:image" content={new URL(image, Astro.site)} />    <meta property="og:type" content="website" />    <meta name="twitter:card" content="summary_large_image" />  </head>  <body class="min-h-screen bg-[var(--color-bg)] text-[var(--color-text)]">    <slot />  </body></html>
Three things to note. First, fonts and CSS import once here — never in child components. Second, the Props interface gives TypeScript full type checking on every page that uses this layout. Third, <slot /> is Astro’s composition primitive. It works like React’s children but with zero JavaScript overhead.
Step 7: Content Collections and Schema
Astro 5 introduced the Content Layer API for managing structured content. Define your schema once in src/content.config.ts, and every MDX file is validated at build time.
import { defineCollection, z } from 'astro:content';import { glob } from 'astro/loaders';
const blog = defineCollection({  loader: glob({ pattern: '**/*.mdx', base: './src/content/blog' }),  schema: ({ image }) => z.object({    title: z.string().max(100),    description: z.string().max(300),    pubDate: z.coerce.date(),    updatedDate: z.coerce.date().optional(),    heroImage: image(),    heroAlt: z.string(),    author: z.string().default('default'),    tags: z.array(z.string()),    category: z.enum([      'engineering', 'architecture', 'data', 'devops',      'ai-ml', 'rust', 'frontend', 'tutorial',    ]),    draft: z.boolean().default(false),    featured: z.boolean().default(false),    series: z.object({      slug: z.string(),      order: z.number(),    }).optional(),    toc: z.boolean().default(true),  }),});
export const collections = { blog };
The image() helper is critical. It tells Astro to process hero images through Sharp — generating responsive AVIF, WebP, and JPEG variants with proper srcset attributes. Raw image paths in frontmatter become fully optimized <img> elements at build time.
The z.coerce.date() call handles YAML date values, which parse as strings. Without coerce, Zod rejects pubDate: 2026-04-10 because it is a string, not a Date object.
Step 8: Build Scripts and Enforcement
A production build pipeline does more than compile code. It enforces invariants. Our package.json scripts run schema validation, island auditing, and OG image generation around the build step.
{ "scripts": { "dev": "astro dev", "build": "astro build", "preview": "astro preview", "prebuild": "pnpm lint:islands && pnpm check:schema", "postbuild": "node scripts/generate-og.mjs", "lint:islands": "bash scripts/check-no-client-load.sh", "check:schema": "npx tsx scripts/check-schema-parity.ts", "check": "astro check" }}The prebuild hook runs two checks before every build:
-
lint:islandsscans every.astrofile forclient:loaddirectives. If any component usesclient:load(except the banned-exception list), the build fails. This enforces the performance budget we cover in Part 2. -
check:schemavalidates that the Keystatic CMS configuration mirrors the Zod schema incontent.config.ts. Schema drift between the CMS and the content pipeline causes silent data loss.
Step 9: Cloudflare Pages Deployment
Astro’s Cloudflare adapter generates a Worker-compatible bundle. The static pages serve from Cloudflare’s CDN. Server-rendered routes (the CMS admin, AI endpoints) run on the edge.
name = "blogcraft"compatibility_date = "2025-09-01"compatibility_flags = ["nodejs_compat_v2"]
[site]bucket = "./dist"
The nodejs_compat_v2 flag is required for React 19’s server-side rendering on Cloudflare’s workerd runtime. Without it, react-dom/server throws at import time.
The GitHub Actions workflow handles the full pipeline:
name: Deployon:  push:    branches: [main]
jobs:  deploy:    runs-on: ubuntu-latest    steps:      - uses: actions/checkout@v4      - uses: pnpm/action-setup@v4      - uses: actions/setup-node@v4        with:          node-version: 22          cache: pnpm
      - run: pnpm install --frozen-lockfile      - run: npx playwright install --with-deps chromium      - run: pnpm build
      - name: Deploy to Cloudflare Pages        uses: cloudflare/wrangler-action@v3        with:          command: pages deploy dist --project-name=blogcraft
The Complete Integration Order
The order in which integrations register determines how content is processed. Here is the full pipeline, in execution order:
%3b%7d%23mermaid-1 .cluster rect%7bfill:hsl(0%2c 0%25%2c 98.9215686275%25)%3bstroke:%23707070%3bstroke-width:1px%3b%7d%23mermaid-1 .cluster text%7bfill:%23333%3b%7d%23mermaid-1 .cluster span%7bcolor:%23333%3b%7d%23mermaid-1 div.mermaidTooltip%7bposition:absolute%3btext-align:center%3bmax-width:200px%3bpadding:2px%3bfont-family:arial%2csans-serif%3bfont-size:12px%3bbackground:hsl(-160%2c 0%25%2c 93.3333333333%25)%3bborder:1px solid %23707070%3bborder-radius:2px%3bpointer-events:none%3bz-index:100%3b%7d%23mermaid-1 .flowchartTitleText%7btext-anchor:middle%3bfont-size:18px%3bfill:black%3b%7d%23mermaid-1 rect.text%7bfill:none%3bstroke-width:0%3b%7d%23mermaid-1 .icon-shape%2c%23mermaid-1 .image-shape%7bbackground-color:white%3btext-align:center%3b%7d%23mermaid-1 .icon-shape p%2c%23mermaid-1 .image-shape p%7bbackground-color:white%3bpadding:2px%3b%7d%23mermaid-1 .icon-shape .label rect%2c%23mermaid-1 .image-shape .label rect%7bopacity:0.5%3bbackground-color:white%3bfill:white%3b%7d%23mermaid-1 .label-icon%7bdisplay:inline-block%3bheight:1em%3boverflow:visible%3bvertical-align:-0.125em%3b%7d%23mermaid-1 .node .label-icon path%7bfill:currentColor%3bstroke:revert%3bstroke-width:revert%3b%7d%23mermaid-1 .node .neo-node%7bstroke:%23999%3b%7d%23mermaid-1 %5bdata-look='neo'%5d.node rect%2c%23mermaid-1 %5bdata-look='neo'%5d.cluster rect%2c%23mermaid-1 %5bdata-look='neo'%5d.node polygon%7bstroke:url(%23mermaid-1-gradient)%3bfilter:drop-shadow( 1px 2px 2px rgba(185%2c185%2c185%2c1))%3b%7d%23mermaid-1 %5bdata-look='neo'%5d.node path%7bstroke:url(%23mermaid-1-gradient)%3bstroke-width:1px%3b%7d%23mermaid-1 %5bdata-look='neo'%5d.node .outer-path%7bfilter:drop-shadow( 1px 2px 2px rgba(185%2c185%2c185%2c1))%3b%7d%23mermaid-1 %5bdata-look='neo'%5d.node .neo-line path%7bstroke:%23999%3bfilter:none%3b%7d%23mermaid-1 %5bdata-look='neo'%5d.node circle%7bstroke:url(%23mermaid-1-gradient)%3bfilter:drop-shadow( 1px 2px 2px rgba(185%2c185%2c185%2c1))%3b%7d%23mermaid-1 %5bdata-look='neo'%5d.node circle .state-start%7bfill:black%3b%7d%23mermaid-1 %5bdata-look='neo'%5d.icon-shape .icon%7bfill:url(%23mermaid-1-gradient)%3bfilter:drop-shadow( 1px 2px 2px rgba(185%2c185%2c185%2c1))%3b%7d%23mermaid-1 %5bdata-look='neo'%5d.icon-shape .icon-neo path%7bstroke:url(%23mermaid-1-gradient)%3bfilter:drop-shadow( 1px 2px 2px rgba(185%2c185%2c185%2c1))%3b%7d%23mermaid-1 :root%7b--mermaid-font-family:arial%2csans-serif%3b%7d%3c/style%3e%3cg%3e%3cmarker id='mermaid-1_flowchart-v2-pointEnd' class='marker flowchart-v2' viewBox='0 0 10 10' refX='5' refY='5' markerUnits='userSpaceOnUse' markerWidth='8' markerHeight='8' orient='auto'%3e%3cpath d='M 0 0 L 10 5 L 0 10 z' class='arrowMarkerPath' style='stroke-width: 1%3b stroke-dasharray: 1%2c 0%3b'/%3e%3c/marker%3e%3cmarker id='mermaid-1_flowchart-v2-pointStart' class='marker flowchart-v2' viewBox='0 0 10 10' refX='4.5' refY='5' markerUnits='userSpaceOnUse' markerWidth='8' markerHeight='8' orient='auto'%3e%3cpath d='M 0 5 L 10 10 L 10 0 z' class='arrowMarkerPath' style='stroke-width: 1%3b stroke-dasharray: 1%2c 0%3b'/%3e%3c/marker%3e%3cmarker id='mermaid-1_flowchart-v2-pointEnd-margin' class='marker flowchart-v2' viewBox='0 0 11.5 14' refX='11.5' refY='7' markerUnits='userSpaceOnUse' markerWidth='10.5' markerHeight='14' orient='auto'%3e%3cpath d='M 0 0 L 11.5 7 L 0 14 z' class='arrowMarkerPath' style='stroke-width: 0%3b stroke-dasharray: 1%2c 0%3b'/%3e%3c/marker%3e%3cmarker id='mermaid-1_flowchart-v2-pointStart-margin' class='marker flowchart-v2' viewBox='0 0 11.5 14' refX='1' refY='7' markerUnits='userSpaceOnUse' markerWidth='11.5' markerHeight='14' orient='auto'%3e%3cpolygon points='0%2c7 11.5%2c14 11.5%2c0' class='arrowMarkerPath' style='stroke-width: 0%3b stroke-dasharray: 1%2c 0%3b'/%3e%3c/marker%3e%3cmarker id='mermaid-1_flowchart-v2-circleEnd' class='marker flowchart-v2' viewBox='0 0 10 10' refX='11' refY='5' markerUnits='userSpaceOnUse' markerWidth='11' markerHeight='11' orient='auto'%3e%3ccircle cx='5' cy='5' r='5' class='arrowMarkerPath' style='stroke-width: 1%3b stroke-dasharray: 1%2c 0%3b'/%3e%3c/marker%3e%3cmarker id='mermaid-1_flowchart-v2-circleStart' class='marker flowchart-v2' viewBox='0 0 10 10' refX='-1' refY='5' markerUnits='userSpaceOnUse' markerWidth='11' markerHeight='11' orient='auto'%3e%3ccircle cx='5' cy='5' r='5' class='arrowMarkerPath' style='stroke-width: 1%3b stroke-dasharray: 1%2c 0%3b'/%3e%3c/marker%3e%3cmarker id='mermaid-1_flowchart-v2-circleEnd-margin' class='marker flowchart-v2' viewBox='0 0 10 10' refY='5' refX='12.25' markerUnits='userSpaceOnUse' markerWidth='14' markerHeight='14' orient='auto'%3e%3ccircle cx='5' cy='5' r='5' class='arrowMarkerPath' style='stroke-width: 0%3b stroke-dasharray: 1%2c 0%3b'/%3e%3c/marker%3e%3cmarker id='mermaid-1_flowchart-v2-circleStart-margin' class='marker flowchart-v2' viewBox='0 0 10 10' refX='-2' refY='5' markerUnits='userSpaceOnUse' markerWidth='14' markerHeight='14' orient='auto'%3e%3ccircle cx='5' cy='5' r='5' class='arrowMarkerPath' style='stroke-width: 0%3b stroke-dasharray: 1%2c 0%3b'/%3e%3c/marker%3e%3cmarker id='mermaid-1_flowchart-v2-crossEnd' class='marker cross flowchart-v2' viewBox='0 0 11 11' refX='12' refY='5.2' markerUnits='userSpaceOnUse' markerWidth='11' markerHeight='11' orient='auto'%3e%3cpath d='M 1%2c1 l 9%2c9 M 10%2c1 l -9%2c9' class='arrowMarkerPath' style='stroke-width: 2%3b stroke-dasharray: 1%2c 0%3b'/%3e%3c/marker%3e%3cmarker id='mermaid-1_flowchart-v2-crossStart' class='marker cross flowchart-v2' viewBox='0 0 11 11' refX='-1' refY='5.2' markerUnits='userSpaceOnUse' markerWidth='11' markerHeight='11' orient='auto'%3e%3cpath d='M 1%2c1 l 9%2c9 M 10%2c1 l -9%2c9' class='arrowMarkerPath' style='stroke-width: 2%3b stroke-dasharray: 1%2c 0%3b'/%3e%3c/marker%3e%3cmarker id='mermaid-1_flowchart-v2-crossEnd-margin' class='marker cross flowchart-v2' viewBox='0 0 15 15' refX='17.7' refY='7.5' markerUnits='userSpaceOnUse' markerWidth='12' markerHeight='12' orient='auto'%3e%3cpath d='M 1%2c1 L 14%2c14 M 1%2c14 L 14%2c1' class='arrowMarkerPath' style='stroke-width: 2.5%3b'/%3e%3c/marker%3e%3cmarker id='mermaid-1_flowchart-v2-crossStart-margin' class='marker cross flowchart-v2' viewBox='0 0 15 15' refX='-3.5' refY='7.5' markerUnits='userSpaceOnUse' markerWidth='12' markerHeight='12' orient='auto'%3e%3cpath d='M 1%2c1 L 14%2c14 M 1%2c14 L 14%2c1' class='arrowMarkerPath' style='stroke-width: 2.5%3b stroke-dasharray: 1%2c 0%3b'/%3e%3c/marker%3e%3cg class='root'%3e%3cg class='clusters'/%3e%3cg class='edgePaths'%3e%3cpath d='M138%2c86L138%2c90.167C138%2c94.333%2c138%2c102.667%2c138%2c110.333C138%2c118%2c138%2c125%2c138%2c128.5L138%2c132' id='mermaid-1-L_A_B_0' class='edge-thickness-normal edge-pattern-solid edge-thickness-normal edge-pattern-solid flowchart-link' style='%3b' data-edge='true' data-et='edge' data-id='L_A_B_0' data-points='W3sieCI6MTM4LCJ5Ijo4Nn0seyJ4IjoxMzgsInkiOjExMX0seyJ4IjoxMzgsInkiOjEzNn1d' data-look='classic' marker-end='url(%23mermaid-1_flowchart-v2-pointEnd)'/%3e%3cpath d='M138%2c238L138%2c242.167C138%2c246.333%2c138%2c254.667%2c138%2c262.333C138%2c270%2c138%2c277%2c138%2c280.5L138%2c284' id='mermaid-1-L_B_C_0' class='edge-thickness-normal edge-pattern-solid edge-thickness-normal edge-pattern-solid flowchart-link' style='%3b' data-edge='true' data-et='edge' data-id='L_B_C_0' data-points='W3sieCI6MTM4LCJ5IjoyMzh9LHsieCI6MTM4LCJ5IjoyNjN9LHsieCI6MTM4LCJ5IjoyODh9XQ==' data-look='classic' marker-end='url(%23mermaid-1_flowchart-v2-pointEnd)'/%3e%3cpath d='M138%2c366L138%2c370.167C138%2c374.333%2c138%2c382.667%2c138%2c390.333C138%2c398%2c138%2c405%2c138%2c408.5L138%2c412' id='mermaid-1-L_C_D_0' class='edge-thickness-normal edge-pattern-solid edge-thickness-normal edge-pattern-solid flowchart-link' style='%3b' data-edge='true' data-et='edge' data-id='L_C_D_0' data-points='W3sieCI6MTM4LCJ5IjozNjZ9LHsieCI6MTM4LCJ5IjozOTF9LHsieCI6MTM4LCJ5Ijo0MTZ9XQ==' data-look='classic' marker-end='url(%23mermaid-1_flowchart-v2-pointEnd)'/%3e%3cpath d='M138%2c494L138%2c498.167C138%2c502.333%2c138%2c510.667%2c138%2c518.333C138%2c526%2c138%2c533%2c138%2c536.5L138%2c540' id='mermaid-1-L_D_E_0' class='edge-thickness-normal edge-pattern-solid edge-thickness-normal edge-pattern-solid flowchart-link' style='%3b' data-edge='true' data-et='edge' data-id='L_D_E_0' data-points='W3sieCI6MTM4LCJ5Ijo0OTR9LHsieCI6MTM4LCJ5Ijo1MTl9LHsieCI6MTM4LCJ5Ijo1NDR9XQ==' data-look='classic' marker-end='url(%23mermaid-1_flowchart-v2-pointEnd)'/%3e%3cpath d='M138%2c622L138%2c626.167C138%2c630.333%2c138%2c638.667%2c138%2c646.333C138%2c654%2c138%2c661%2c138%2c664.5L138%2c668' id='mermaid-1-L_E_F_0' class='edge-thickness-normal edge-pattern-solid edge-thickness-normal edge-pattern-solid flowchart-link' style='%3b' data-edge='true' data-et='edge' data-id='L_E_F_0' data-points='W3sieCI6MTM4LCJ5Ijo2MjJ9LHsieCI6MTM4LCJ5Ijo2NDd9LHsieCI6MTM4LCJ5Ijo2NzJ9XQ==' data-look='classic' marker-end='url(%23mermaid-1_flowchart-v2-pointEnd)'/%3e%3cpath d='M138%2c750L138%2c754.167C138%2c758.333%2c138%2c766.667%2c138%2c774.333C138%2c782%2c138%2c789%2c138%2c792.5L138%2c796' id='mermaid-1-L_F_G_0' class='edge-thickness-normal edge-pattern-solid edge-thickness-normal edge-pattern-solid flowchart-link' style='%3b' data-edge='true' data-et='edge' data-id='L_F_G_0' data-points='W3sieCI6MTM4LCJ5Ijo3NTB9LHsieCI6MTM4LCJ5Ijo3NzV9LHsieCI6MTM4LCJ5Ijo4MDB9XQ==' data-look='classic' marker-end='url(%23mermaid-1_flowchart-v2-pointEnd)'/%3e%3cpath d='M138%2c878L138%2c882.167C138%2c886.333%2c138%2c894.667%2c138%2c902.333C138%2c910%2c138%2c917%2c138%2c920.5L138%2c924' id='mermaid-1-L_G_H_0' class='edge-thickness-normal edge-pattern-solid edge-thickness-normal edge-pattern-solid flowchart-link' style='%3b' data-edge='true' data-et='edge' data-id='L_G_H_0' data-points='W3sieCI6MTM4LCJ5Ijo4Nzh9LHsieCI6MTM4LCJ5Ijo5MDN9LHsieCI6MTM4LCJ5Ijo5Mjh9XQ==' data-look='classic' marker-end='url(%23mermaid-1_flowchart-v2-pointEnd)'/%3e%3cpath d='M138%2c1006L138%2c1010.167C138%2c1014.333%2c138%2c1022.667%2c138%2c1030.333C138%2c1038%2c138%2c1045%2c138%2c1048.5L138%2c1052' id='mermaid-1-L_H_I_0' class='edge-thickness-normal edge-pattern-solid edge-thickness-normal edge-pattern-solid flowchart-link' style='%3b' data-edge='true' data-et='edge' data-id='L_H_I_0' data-points='W3sieCI6MTM4LCJ5IjoxMDA2fSx7IngiOjEzOCwieSI6MTAzMX0seyJ4IjoxMzgsInkiOjEwNTZ9XQ==' data-look='classic' marker-end='url(%23mermaid-1_flowchart-v2-pointEnd)'/%3e%3cpath d='M138%2c1134L138%2c1138.167C138%2c1142.333%2c138%2c1150.667%2c138%2c1158.333C138%2c1166%2c138%2c1173%2c138%2c1176.5L138%2c1180' id='mermaid-1-L_I_J_0' class='edge-thickness-normal edge-pattern-solid edge-thickness-normal edge-pattern-solid flowchart-link' style='%3b' data-edge='true' data-et='edge' data-id='L_I_J_0' data-points='W3sieCI6MTM4LCJ5IjoxMTM0fSx7IngiOjEzOCwieSI6MTE1OX0seyJ4IjoxMzgsInkiOjExODR9XQ==' data-look='classic' marker-end='url(%23mermaid-1_flowchart-v2-pointEnd)'/%3e%3cpath d='M138%2c1262L138%2c1266.167C138%2c1270.333%2c138%2c1278.667%2c138%2c1286.333C138%2c1294%2c138%2c1301%2c138%2c1304.5L138%2c1308' id='mermaid-1-L_J_K_0' class='edge-thickness-normal edge-pattern-solid edge-thickness-normal edge-pattern-solid flowchart-link' style='%3b' data-edge='true' data-et='edge' data-id='L_J_K_0' data-points='W3sieCI6MTM4LCJ5IjoxMjYyfSx7IngiOjEzOCwieSI6MTI4N30seyJ4IjoxMzgsInkiOjEzMTJ9XQ==' data-look='classic' marker-end='url(%23mermaid-1_flowchart-v2-pointEnd)'/%3e%3c/g%3e%3cg class='edgeLabels'%3e%3cg class='edgeLabel'%3e%3cg class='label' data-id='L_A_B_0' transform='translate(0%2c 0)'%3e%3cforeignObject width='0' height='0'%3e%3cdiv xmlns='http://www.w3.org/1999/xhtml' class='labelBkg' style='display: table-cell%3b white-space: nowrap%3b line-height: 1.5%3b max-width: 200px%3b text-align: center%3b'%3e%3cspan class='edgeLabel'%3e%3c/span%3e%3c/div%3e%3c/foreignObject%3e%3c/g%3e%3c/g%3e%3cg class='edgeLabel'%3e%3cg class='label' data-id='L_B_C_0' transform='translate(0%2c 0)'%3e%3cforeignObject width='0' height='0'%3e%3cdiv xmlns='http://www.w3.org/1999/xhtml' class='labelBkg' style='display: table-cell%3b white-space: nowrap%3b line-height: 1.5%3b max-width: 200px%3b text-align: center%3b'%3e%3cspan class='edgeLabel'%3e%3c/span%3e%3c/div%3e%3c/foreignObject%3e%3c/g%3e%3c/g%3e%3cg class='edgeLabel'%3e%3cg class='label' data-id='L_C_D_0' transform='translate(0%2c 0)'%3e%3cforeignObject width='0' height='0'%3e%3cdiv xmlns='http://www.w3.org/1999/xhtml' class='labelBkg' style='display: table-cell%3b white-space: nowrap%3b line-height: 1.5%3b max-width: 200px%3b text-align: center%3b'%3e%3cspan class='edgeLabel'%3e%3c/span%3e%3c/div%3e%3c/foreignObject%3e%3c/g%3e%3c/g%3e%3cg class='edgeLabel'%3e%3cg class='label' data-id='L_D_E_0' transform='translate(0%2c 0)'%3e%3cforeignObject width='0' height='0'%3e%3cdiv xmlns='http://www.w3.org/1999/xhtml' class='labelBkg' style='display: table-cell%3b white-space: nowrap%3b line-height: 1.5%3b max-width: 200px%3b text-align: center%3b'%3e%3cspan class='edgeLabel'%3e%3c/span%3e%3c/div%3e%3c/foreignObject%3e%3c/g%3e%3c/g%3e%3cg class='edgeLabel'%3e%3cg class='label' data-id='L_E_F_0' transform='translate(0%2c 0)'%3e%3cforeignObject width='0' height='0'%3e%3cdiv xmlns='http://www.w3.org/1999/xhtml' class='labelBkg' style='display: table-cell%3b white-space: nowrap%3b line-height: 1.5%3b max-width: 200px%3b text-align: center%3b'%3e%3cspan class='edgeLabel'%3e%3c/span%3e%3c/div%3e%3c/foreignObject%3e%3c/g%3e%3c/g%3e%3cg class='edgeLabel'%3e%3cg class='label' data-id='L_F_G_0' transform='translate(0%2c 0)'%3e%3cforeignObject width='0' height='0'%3e%3cdiv xmlns='http://www.w3.org/1999/xhtml' class='labelBkg' style='display: table-cell%3b white-space: nowrap%3b line-height: 1.5%3b max-width: 200px%3b text-align: center%3b'%3e%3cspan class='edgeLabel'%3e%3c/span%3e%3c/div%3e%3c/foreignObject%3e%3c/g%3e%3c/g%3e%3cg class='edgeLabel'%3e%3cg class='label' data-id='L_G_H_0' transform='translate(0%2c 0)'%3e%3cforeignObject width='0' height='0'%3e%3cdiv xmlns='http://www.w3.org/1999/xhtml' class='labelBkg' style='display: table-cell%3b white-space: nowrap%3b line-height: 1.5%3b max-width: 200px%3b text-align: center%3b'%3e%3cspan class='edgeLabel'%3e%3c/span%3e%3c/div%3e%3c/foreignObject%3e%3c/g%3e%3c/g%3e%3cg class='edgeLabel'%3e%3cg class='label' data-id='L_H_I_0' transform='translate(0%2c 0)'%3e%3cforeignObject width='0' height='0'%3e%3cdiv xmlns='http://www.w3.org/1999/xhtml' class='labelBkg' style='display: table-cell%3b white-space: nowrap%3b line-height: 1.5%3b max-width: 200px%3b text-align: center%3b'%3e%3cspan class='edgeLabel'%3e%3c/span%3e%3c/div%3e%3c/foreignObject%3e%3c/g%3e%3c/g%3e%3cg class='edgeLabel'%3e%3cg class='label' data-id='L_I_J_0' transform='translate(0%2c 0)'%3e%3cforeignObject width='0' height='0'%3e%3cdiv xmlns='http://www.w3.org/1999/xhtml' class='labelBkg' style='display: table-cell%3b white-space: nowrap%3b line-height: 1.5%3b max-width: 200px%3b text-align: center%3b'%3e%3cspan class='edgeLabel'%3e%3c/span%3e%3c/div%3e%3c/foreignObject%3e%3c/g%3e%3c/g%3e%3cg class='edgeLabel'%3e%3cg class='label' data-id='L_J_K_0' transform='translate(0%2c 0)'%3e%3cforeignObject width='0' height='0'%3e%3cdiv xmlns='http://www.w3.org/1999/xhtml' class='labelBkg' style='display: table-cell%3b white-space: nowrap%3b line-height: 1.5%3b max-width: 200px%3b text-align: center%3b'%3e%3cspan class='edgeLabel'%3e%3c/span%3e%3c/div%3e%3c/foreignObject%3e%3c/g%3e%3c/g%3e%3c/g%3e%3cg class='nodes'%3e%3cg class='node default' id='mermaid-1-flowchart-A-0' data-look='classic' transform='translate(138%2c 47)'%3e%3crect class='basic label-container' style='fill:%23f5e8e8 !important%3bstroke:%238C4A4A !important' x='-127.6015625' y='-39' width='255.203125' height='78'/%3e%3cg class='label' style='' transform='translate(-97.6015625%2c -24)'%3e%3crect/%3e%3cforeignObject width='195.203125' height='48'%3e%3cdiv xmlns='http://www.w3.org/1999/xhtml' style='display: table-cell%3b white-space: nowrap%3b line-height: 1.5%3b max-width: 200px%3b text-align: center%3b'%3e%3cspan class='nodeLabel'%3e%3cp%3eprebuild%3cbr /%3elint:islands %2b check:schema%3c/p%3e%3c/span%3e%3c/div%3e%3c/foreignObject%3e%3c/g%3e%3c/g%3e%3cg class='node default' id='mermaid-1-flowchart-B-1' data-look='classic' transform='translate(138%2c 187)'%3e%3crect class='basic label-container' style='fill:%23e8f5e8 !important%3bstroke:%234A8C5C !important' x='-130' y='-51' width='260' height='102'/%3e%3cg class='label' style='' transform='translate(-100%2c -36)'%3e%3crect/%3e%3cforeignObject width='200' height='72'%3e%3cdiv xmlns='http://www.w3.org/1999/xhtml' style='display: table%3b white-space: break-spaces%3b line-height: 1.5%3b max-width: 200px%3b text-align: center%3b width: 200px%3b'%3e%3cspan class='nodeLabel'%3e%3cp%3eExpressive Code%3cbr /%3e(code block syntax highlighting)%3c/p%3e%3c/span%3e%3c/div%3e%3c/foreignObject%3e%3c/g%3e%3c/g%3e%3cg class='node default' id='mermaid-1-flowchart-C-3' data-look='classic' transform='translate(138%2c 327)'%3e%3crect class='basic label-container' style='fill:%23e8f5e8 !important%3bstroke:%234A8C5C !important' x='-95.796875' y='-39' width='191.59375' height='78'/%3e%3cg class='label' style='' transform='translate(-65.796875%2c -24)'%3e%3crect/%3e%3cforeignObject width='131.59375' height='48'%3e%3cdiv xmlns='http://www.w3.org/1999/xhtml' style='display: table-cell%3b white-space: nowrap%3b line-height: 1.5%3b max-width: 200px%3b text-align: center%3b'%3e%3cspan class='nodeLabel'%3e%3cp%3e%40astrojs/mdx%3cbr /%3e(MDX compilation)%3c/p%3e%3c/span%3e%3c/div%3e%3c/foreignObject%3e%3c/g%3e%3c/g%3e%3cg class='node default' id='mermaid-1-flowchart-D-5' data-look='classic' transform='translate(138%2c 455)'%3e%3crect class='basic label-container' style='' x='-91.796875' y='-39' width='183.59375' height='78'/%3e%3cg class='label' style='' transform='translate(-61.796875%2c -24)'%3e%3crect/%3e%3cforeignObject width='123.59375' height='48'%3e%3cdiv xmlns='http://www.w3.org/1999/xhtml' style='display: table-cell%3b white-space: nowrap%3b line-height: 1.5%3b max-width: 200px%3b text-align: center%3b'%3e%3cspan class='nodeLabel'%3e%3cp%3eremark-gfm%3cbr /%3e(tables%2c task lists)%3c/p%3e%3c/span%3e%3c/div%3e%3c/foreignObject%3e%3c/g%3e%3c/g%3e%3cg class='node default' id='mermaid-1-flowchart-E-7' data-look='classic' transform='translate(138%2c 583)'%3e%3crect class='basic label-container' style='' x='-78.0234375' y='-39' width='156.046875' height='78'/%3e%3cg class='label' style='' transform='translate(-48.0234375%2c -24)'%3e%3crect/%3e%3cforeignObject width='96.046875' height='48'%3e%3cdiv xmlns='http://www.w3.org/1999/xhtml' style='display: table-cell%3b white-space: nowrap%3b line-height: 1.5%3b max-width: 200px%3b text-align: center%3b'%3e%3cspan class='nodeLabel'%3e%3cp%3erehype-slug%3cbr /%3e(heading IDs)%3c/p%3e%3c/span%3e%3c/div%3e%3c/foreignObject%3e%3c/g%3e%3c/g%3e%3cg class='node default' id='mermaid-1-flowchart-F-9' data-look='classic' transform='translate(138%2c 711)'%3e%3crect class='basic label-container' style='' x='-119.8359375' y='-39' width='239.671875' height='78'/%3e%3cg class='label' style='' transform='translate(-89.8359375%2c -24)'%3e%3crect/%3e%3cforeignObject width='179.671875' height='48'%3e%3cdiv xmlns='http://www.w3.org/1999/xhtml' style='display: table-cell%3b white-space: nowrap%3b line-height: 1.5%3b max-width: 200px%3b text-align: center%3b'%3e%3cspan class='nodeLabel'%3e%3cp%3erehype-autolink-headings%3cbr /%3e(anchor links)%3c/p%3e%3c/span%3e%3c/div%3e%3c/foreignObject%3e%3c/g%3e%3c/g%3e%3cg class='node default' id='mermaid-1-flowchart-G-11' data-look='classic' transform='translate(138%2c 839)'%3e%3crect class='basic label-container' style='' x='-119.375' y='-39' width='238.75' height='78'/%3e%3cg class='label' style='' transform='translate(-89.375%2c -24)'%3e%3crect/%3e%3cforeignObject width='178.75' height='48'%3e%3cdiv xmlns='http://www.w3.org/1999/xhtml' style='display: table-cell%3b white-space: nowrap%3b line-height: 1.5%3b max-width: 200px%3b text-align: center%3b'%3e%3cspan class='nodeLabel'%3e%3cp%3erehype-mermaid%3cbr /%3e(diagram SVG rendering)%3c/p%3e%3c/span%3e%3c/div%3e%3c/foreignObject%3e%3c/g%3e%3c/g%3e%3cg class='node default' id='mermaid-1-flowchart-H-13' data-look='classic' transform='translate(138%2c 967)'%3e%3crect class='basic label-container' style='' x='-91.3671875' y='-39' width='182.734375' height='78'/%3e%3cg class='label' style='' transform='translate(-61.3671875%2c -24)'%3e%3crect/%3e%3cforeignObject width='122.734375' height='48'%3e%3cdiv xmlns='http://www.w3.org/1999/xhtml' style='display: table-cell%3b white-space: nowrap%3b line-height: 1.5%3b max-width: 200px%3b text-align: center%3b'%3e%3cspan class='nodeLabel'%3e%3cp%3e%40astrojs/react%3cbr /%3e(island hydration)%3c/p%3e%3c/span%3e%3c/div%3e%3c/foreignObject%3e%3c/g%3e%3c/g%3e%3cg class='node default' id='mermaid-1-flowchart-I-15' data-look='classic' transform='translate(138%2c 1095)'%3e%3crect class='basic label-container' style='' x='-120.2734375' y='-39' width='240.546875' height='78'/%3e%3cg class='label' style='' transform='translate(-90.2734375%2c -24)'%3e%3crect/%3e%3cforeignObject width='180.546875' height='48'%3e%3cdiv xmlns='http://www.w3.org/1999/xhtml' style='display: table-cell%3b white-space: nowrap%3b line-height: 1.5%3b max-width: 200px%3b text-align: center%3b'%3e%3cspan class='nodeLabel'%3e%3cp%3eSharp image optimization%3cbr /%3e(AVIF/WebP/JPEG)%3c/p%3e%3c/span%3e%3c/div%3e%3c/foreignObject%3e%3c/g%3e%3c/g%3e%3cg class='node default' id='mermaid-1-flowchart-J-17' data-look='classic' transform='translate(138%2c 1223)'%3e%3crect class='basic label-container' style='' x='-91.921875' y='-39' width='183.84375' height='78'/%3e%3cg class='label' style='' transform='translate(-61.921875%2c -24)'%3e%3crect/%3e%3cforeignObject width='123.84375' height='48'%3e%3cdiv xmlns='http://www.w3.org/1999/xhtml' style='display: table-cell%3b white-space: nowrap%3b line-height: 1.5%3b max-width: 200px%3b text-align: center%3b'%3e%3cspan class='nodeLabel'%3e%3cp%3e%40astrojs/sitemap%3cbr /%3e(sitemap.xml)%3c/p%3e%3c/span%3e%3c/div%3e%3c/foreignObject%3e%3c/g%3e%3c/g%3e%3cg class='node default' id='mermaid-1-flowchart-K-19' data-look='classic' transform='translate(138%2c 1351)'%3e%3crect class='basic label-container' style='fill:%23f5e8e8 !important%3bstroke:%238C4A4A !important' x='-106.4921875' y='-39' width='212.984375' height='78'/%3e%3cg class='label' style='' transform='translate(-76.4921875%2c -24)'%3e%3crect/%3e%3cforeignObject width='152.984375' height='48'%3e%3cdiv xmlns='http://www.w3.org/1999/xhtml' style='display: table-cell%3b white-space: nowrap%3b line-height: 1.5%3b max-width: 200px%3b text-align: center%3b'%3e%3cspan class='nodeLabel'%3e%3cp%3epostbuild%3cbr /%3eOG image generation%3c/p%3e%3c/span%3e%3c/div%3e%3c/foreignObject%3e%3c/g%3e%3c/g%3e%3c/g%3e%3c/g%3e%3c/g%3e%3cdefs%3e%3cfilter id='mermaid-1-drop-shadow' height='130%25' width='130%25'%3e%3cfeDropShadow dx='4' dy='4' stdDeviation='0' flood-opacity='0.06' flood-color='black'/%3e%3c/filter%3e%3c/defs%3e%3cdefs%3e%3cfilter id='mermaid-1-drop-shadow-small' height='150%25' width='150%25'%3e%3cfeDropShadow dx='2' dy='2' stdDeviation='0' flood-opacity='0.06' flood-color='black'/%3e%3c/filter%3e%3c/defs%3e%3clinearGradient id='mermaid-1-gradient' gradientUnits='objectBoundingBox' x1='0%25' y1='0%25' x2='100%25' y2='0%25'%3e%3cstop offset='0%25' stop-color='hsl(0%2c 0%25%2c 83.3333333333%25)' stop-opacity='1'/%3e%3cstop offset='100%25' stop-color='hsl(0%2c 0%25%2c 88.9215686275%25)' stop-opacity='1'/%3e%3c/linearGradient%3e%3c/svg%3e)
Each step depends on the output of the previous. Expressive Code wraps code fences in its custom HTML structure. MDX then compiles the document, leaving those code blocks intact. The rehype plugins operate on the compiled HTML AST. Finally, Astro’s image service optimizes any referenced images.
Key Takeaways
- Astro 5 ships zero JS by default — this is not an optimization you configure, it is the architecture. Interactive components opt in via hydration directives.
- Tailwind 4 uses
@tailwindcss/vite, not the old@astrojs/tailwindintegration. Configuration lives in CSS@themeblocks, not JavaScript. - Integration order is load-bearing. Expressive Code before MDX. Always.
- Self-hosted fonts via Fontsource eliminate FOUT and third-party requests. Import once in
BaseLayout.astro. - Content Layer schemas with Zod validate every MDX file at build time. Invalid frontmatter fails the build, not the reader.
- Prebuild enforcement (island linting, schema parity checks) catches invariant violations before they reach production.